


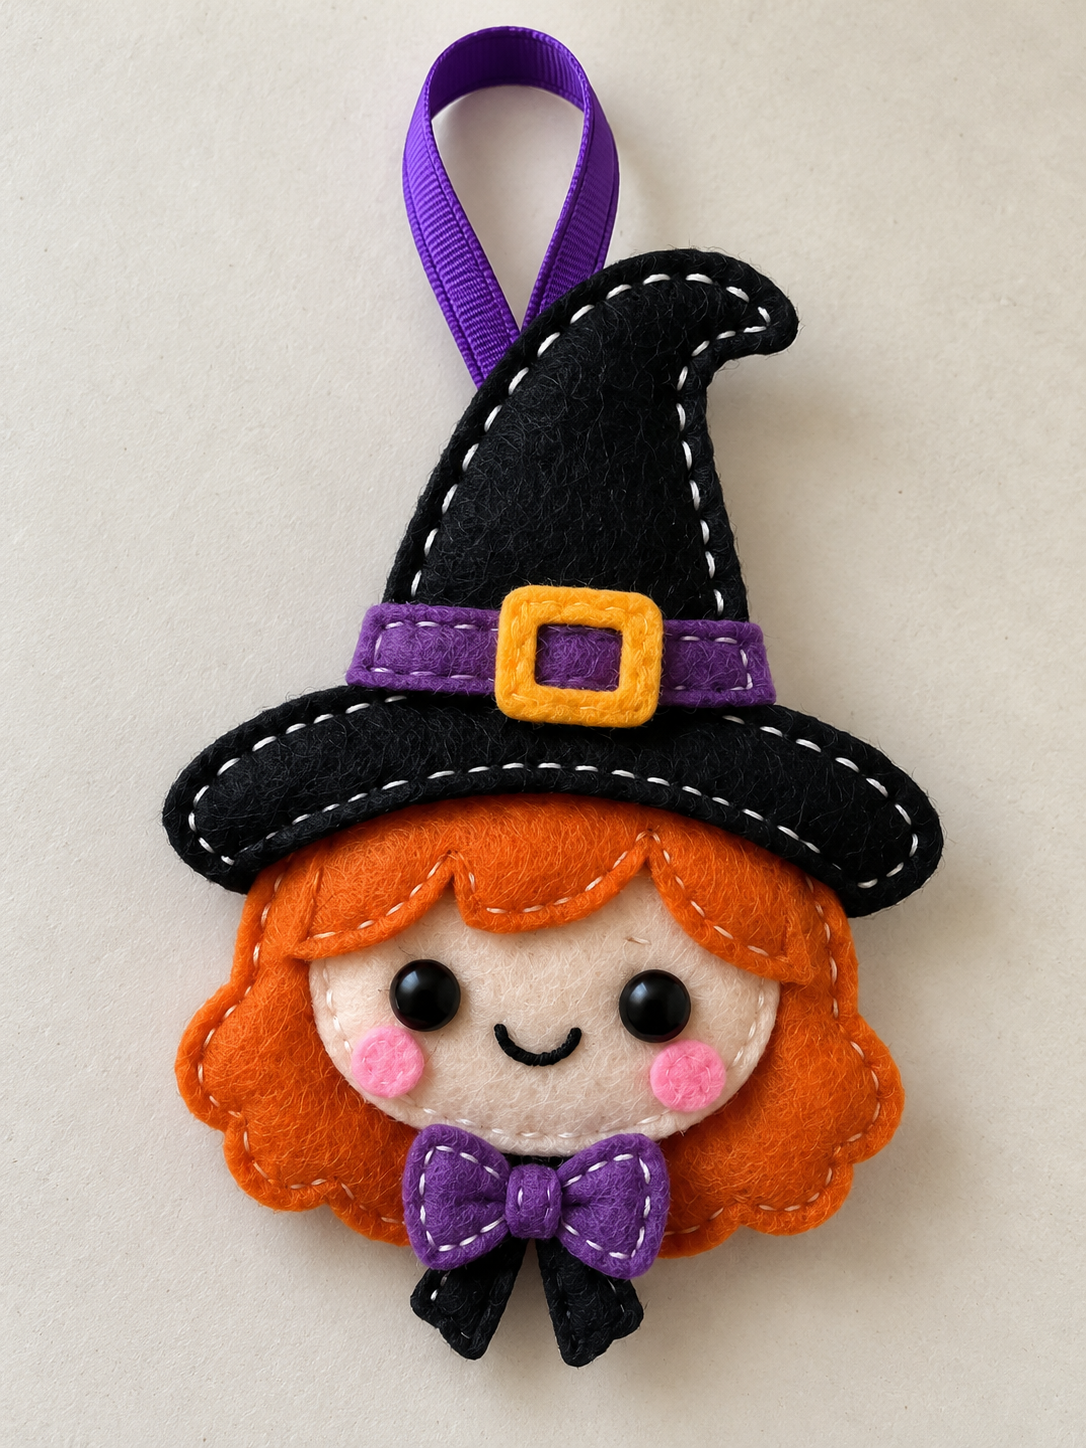
A little orange-haired witch makes such a lovely addition to a Halloween branch, a cupboard knob, or the corner of a handmade garland. Her curved black hat, purple bow, and tiny yellow buckle give this felt ornament plenty of character without needing a sewing machine.
This tutorial makes a small, mostly flat decoration with a gently padded face. The finished witch is about 11 cm tall from the top of her hat to the lowest black bow tail, excluding the hanging ribbon, and about 7.5 cm wide across the brim.
Take your time with the little pieces, especially the buckle and bow centre. The accompanying two-page pattern includes the full-size cutting shapes and an assembly guide, so you can check the arrangement on paper before making the first stitch.
Before you begin
This is a hand-sewn decorative project, best approached with a little patience rather than a deadline. Thin felt, around 1 mm thick, keeps the layers manageable at this small size. Wool-blend or firm craft felt can both be used; avoid very stretchy felt or thick sheets that make the buckle and bow bulky.
The pieces have been checked together digitally; this version has not been test-sewn. The pattern has a 110 mm overall height on paper. Cutting accuracy, felt thickness, and stitching tension can change the finished measurement slightly. Only the face receives a light layer of filling. The hat, hair, bow, and backing stay flat.
Materials and tools
Affiliate disclosure: This post contains Amazon affiliate links. If you buy through these links, I may earn a commission at no extra cost to you. As an Amazon Associate I earn from qualifying purchases.
- Black felt: one 20 x 20 cm piece for the two foundations, brim, tails, and optional felt eyes.
- Orange felt: one 10 x 15 cm piece for the hair and fringe.
- Cream felt: one 6 x 6 cm piece for the face.
- Purple felt: one 6 x 8 cm piece for the hat band, bow, and bow centre.
- Yellow felt: a 3 x 3 cm scrap; pink felt: a 2 x 3 cm scrap.
- Purple ribbon: one 12 cm length, 6 mm wide.
- Embroidery floss in white, black, orange, purple, yellow, pink, and cream, plus matching fine sewing thread if preferred.
- A very small amount of polyester toy filling, sharp small scissors, paper scissors, a hand-sewing needle, pins or clips, a ruler, and tracing paper.
- Optional: two 6 mm black domed sew-on buttons in place of felt or embroidered eyes. Use sew-on buttons rather than glued beads.
Keep needles, loose threads, filling, and small pieces away from children and pets. The finished ornament is a decoration, not a toy. Embroidered eyes avoid loose eye pieces, but the ribbon and other small details still make it unsuitable for play.
Print the pattern at the correct size
Download the free 11 cm felt witch pattern PDF (two pages, including full-size pieces and an assembly guide).
Print both PDF pages at Actual Size or 100%. Turn off Fit to Page, Shrink, and booklet printing. The artwork fits within the printable area of either US Letter or A4 paper, provided the printer does not rescale it.
Measure the calibration square on page one. It must be 20 mm wide and 20 mm high. If either measurement is wrong, correct the print settings and print again before cutting anything. Do not enlarge a screenshot of the pattern or use the photograph as a tracing template.
Cut on the solid outlines. No extra seam allowance is needed because the felt edges remain on the outside; none of these pieces is sewn right sides together and turned. The dashed line and rectangle on foundation A are placement marks, not cuts. The small inner outline in buckle G is the one opening that must be cut out.
Cutting list
The measurements below are approximate maximum widths and heights, in millimetres. Use the printed outlines for the curves and notches. The foundation is shorter than the finished ornament because the black tails extend below it.
| ID | Piece | Cut quantity | Approx W x H mm |
|---|---|---|---|
| A | Foundation | 2 black | 74.8 x 98.6 |
| B | Hair | 1 orange | 65.6 x 50.2 |
| C | Face | 1 cream | 44.0 x 44.0 |
| D | Fringe | 1 orange | 50.8 x 23.5 |
| E | Brim | 1 black | 74.8 x 19.0 |
| F | Hat band | 1 purple | 38.1 x 11.7 |
| G | Buckle | 1 yellow | 15.4 x 14.7 |
| H | Bow | 1 purple | 27.5 x 13.7 |
| I | Bow centre | 1 purple | 5.9 x 9.5 |
| J | Tails | 1 of each black | 9.5 x 20.5 |
| K | Cheeks | 2 pink | 6 mm diameter |
| L | Eyes optional | 2 black | 6 mm diameter |
Buckle opening: approximately 6.6 x 5.1 mm. Ribbon: 120 x 6 mm. Total: 14 felt pieces with embroidered eyes, or 16 with felt eyes.
1 Cut and arrange the felt pieces
Cut the paper templates first, then trace around them on the felt with a fine removable marker. Cut just inside the marked line so ink does not show on the finished edges. For the two foundations, cut one, lay it over the second piece of felt, and check that both outlines match before sewing.
The black foundation supplies the tall hat crown as well as the backing behind the head. There is no separate crown piece to add. The orange hair is one continuous shape behind the face, with a separate fringe laid over the forehead. This construction gives the small ornament a supported edge and keeps loose side locks from twisting.
Trace the coloured assembly guide onto tracing paper and use it as a placement overlay. Lay all the felt pieces in order before stitching. Check the band, fringe, face, bow, and tails together, then lift away the layers without changing their orientation.
2 Sew the face details
Transfer the eye centres and smile from template C. The eye centres are about 20.5 mm apart and sit about 28.6 mm down from the top of the 44 mm face circle. Use the printed marks rather than measuring from the curved sides.
For soft felt eyes, sew the two black circles down with several small stitches around their edges. Alternatively, embroider filled black circles or securely sew on the optional buttons. Work all eye attachments while the back of the face is still accessible.
Embroider the curved smile with two strands of black floss and small backstitches. Sew the pink cheeks just below the eyes, following the assembly guide. Use tiny securing stitches instead of trying to fit a large decorative stitch ring into each small circle. Keep the face-edge seam about 1.5 mm inside the cream edge beside the cheeks.
3 Lightly pad the face on the hair
Place the face on orange hair B using the tracing overlay. Its top is about 2.9 mm below the top of the hair panel. Check that the hair stays visible down both sides and below the chin. Pin sparingly so the felt does not stretch.
Use cream thread to sew around the face, about 1.5 to 2 mm inside its edge. Leave a 10 mm opening along the upper edge, which the fringe will cover later. Slide in a thin, teased-out layer of filling. You want a gentle dome, not a firm ball. If the circle pulls inward or the hair panel cups, remove some filling.
Close the opening. Lay fringe D over the upper face and hair panel. Its top sits about 0.7 mm below the top of B. Sew the curved lower fringe edge with small orange or cream running stitches, then anchor its top with a few stitches that the brim will hide. Leave the outermost hair edge free for the final joining seam.
4 Anchor the tails and mount the hair
Set one black foundation aside as the back. On the front foundation, position the two black tails J with their narrow rectangular roots pointing upward. Follow the guide: the top of each root is about 89.5 mm below the hat tip, and the lowest points finish 110 mm below the tip.
Sew through each root and the front foundation with several short, strong stitches. The roots overlap the foundation by roughly 7 to 9 mm and will be concealed by the orange hair. Check the total paper-guide height before covering them; pushing the tails too far upward changes the finished size.
Lay the decorated hair panel over the front foundation and tail roots. Match the scalloped lower outline of the orange hair to the foundation. Baste the hair in the upper area that the brim will cover. Do not permanently sew a second seam around the hair perimeter yet: the final joining seam will secure the hair and both foundations together.
5 Build the hat
Add the white running-stitch decoration to the exposed crown of the front foundation. Make small, evenly spaced stitches about 2 mm inside the edge, stopping where the purple band will cover the line. Keep the thread relaxed so the curled tip stays flat. The stitches should look handmade, with a steady rhythm rather than tight tension.
Position purple band F, then black brim E, following the assembly guide. The brim overlaps the lower part of the band and the top of the fringe. Sew the band where its stitches will be hidden or neatly visible, then secure the brim with white running stitches around its edge. Take care that these stitches catch the front foundation, especially near the brim ends. Do not add filling to the brim.
Carefully snip the centre opening from yellow buckle G. Fold the felt only enough to start the opening, then trim to the printed inner outline. Place the buckle over the band after the brim is attached. Its opening should show purple throughout. If black shows inside the opening, check the band and buckle positions against the guide before sewing. Attach the frame with tiny yellow stitches through its outer edge; its narrow sides do not need two rows of stitching.
6 Attach the ribbon and close the back
Fold the 12 cm ribbon in half and stack its cut ends. Place 15 mm of both ends on the back of the front foundation, within the marked rectangle near the crown. Let the loop extend upward beyond the hat. Secure the ends with two short rows of backstitch across the ribbon, spaced apart within the overlap. Use black thread so the small stitches blend into the front of the crown. The final backing conceals the ribbon ends and thread knots.
Lay the second foundation behind the decorated front, with the edges aligned. Use orange running stitches about 1.5 mm inside the shared hair edge, sewing through the orange hair and both black foundations in this one seam. Around the hat and brim, use small black edge whipstitches with shallow bites of about 1 mm. Keep these edge stitches separate from the white decorative line. Keep the free tail ends out of the perimeter seam; the bow will be added afterward.
Work carefully around the curled hat tip and the hair scallops, taking shorter stitches on tight curves. Keep the backing flat and do not stuff it. At the ribbon exit, stitch close to each side without sewing across the hanging loop. Secure the thread, bury the ends between the layers, and remove any temporary basting that is still visible.
7 Add the purple bow
Sew a short white or pale-purple running-stitch line inside each bow lobe if you want the contrast detail from the illustration. Keep these stitches small and leave room near the centre for the separate knot piece.
Place bow H below the chin, over the hair and the black tail roots. It is a flat cut-out bow, so do not gather or fold it: doing so would change its planned size. Sew securely through the middle and through the upper part of each lobe where it overlaps the hair. The lower parts can remain free over the tails.
Lay centre piece I on top and secure it through the middle of the bow with a few tiny matching stitches. At approximately 6 mm wide, it is too small for a heavy outline seam. The bow should cover the tail attachment stitches while both black tips remain visible beneath it.
Finishing checks
Lay the ornament flat and measure from the highest point of the felt hat to the lowest black tail. It should be about 11 cm. The ribbon is excluded. Check that the face sits softly, the brim is firmly attached at both ends, and the buckle opening shows the purple band. Give the ribbon and sewn details a gentle tug to check their attachments.
Trim only stray fibres, not the stitched outline. Store the ornament flat and dry between seasons. A soft brush can lift surface dust; soaking or vigorous rubbing may distort the felt or the filling.
Frequently asked questions
Can I make the witch without stuffing
Yes. Sew the face directly to the hair with no filling for a completely flat ornament. Use the same pattern pieces and placement guide. The expression, fringe, bow, and colour layers will still give the design plenty of detail.
Why does my printed pattern look too small
The printer may have used Fit or Shrink automatically. Check the 20 mm calibration square rather than judging the design on screen. Print both pages again at 100% or Actual Size if the square is wrong. Keep all pieces at the same scale; enlarging only the face or hat will change how they fit.
Can I use glue instead of sewing
A tiny amount of felt-compatible fabric glue can help hold a large layer temporarily, but test it on a scrap first. Keep glue away from needle paths and the face opening. Sew the ribbon, tail roots, bow, small details, and final perimeter securely. Glue alone is not a good substitute for the structural stitches in this design.
How can I get a tidy finish on the small pieces
Use thin felt, sharp pointed scissors, and a short length of thread. Cut the buckle opening slowly and avoid pulling on the narrow frame. Separate embroidery floss into one or two strands for the smallest details. Try a few stitches on scrap felt first, then aim for a relaxed, even tension that leaves each piece lying flat.
A little finishing thought
The charm of this witch is in the small touches: the curl in her hat, the cheerful orange fringe, and that little purple bow. Let the stitches show, take the tiny pieces slowly, and use the full-size guide whenever you need to check the arrangement. She is a sweet little decoration to bring out each October.

Leave a Comment