


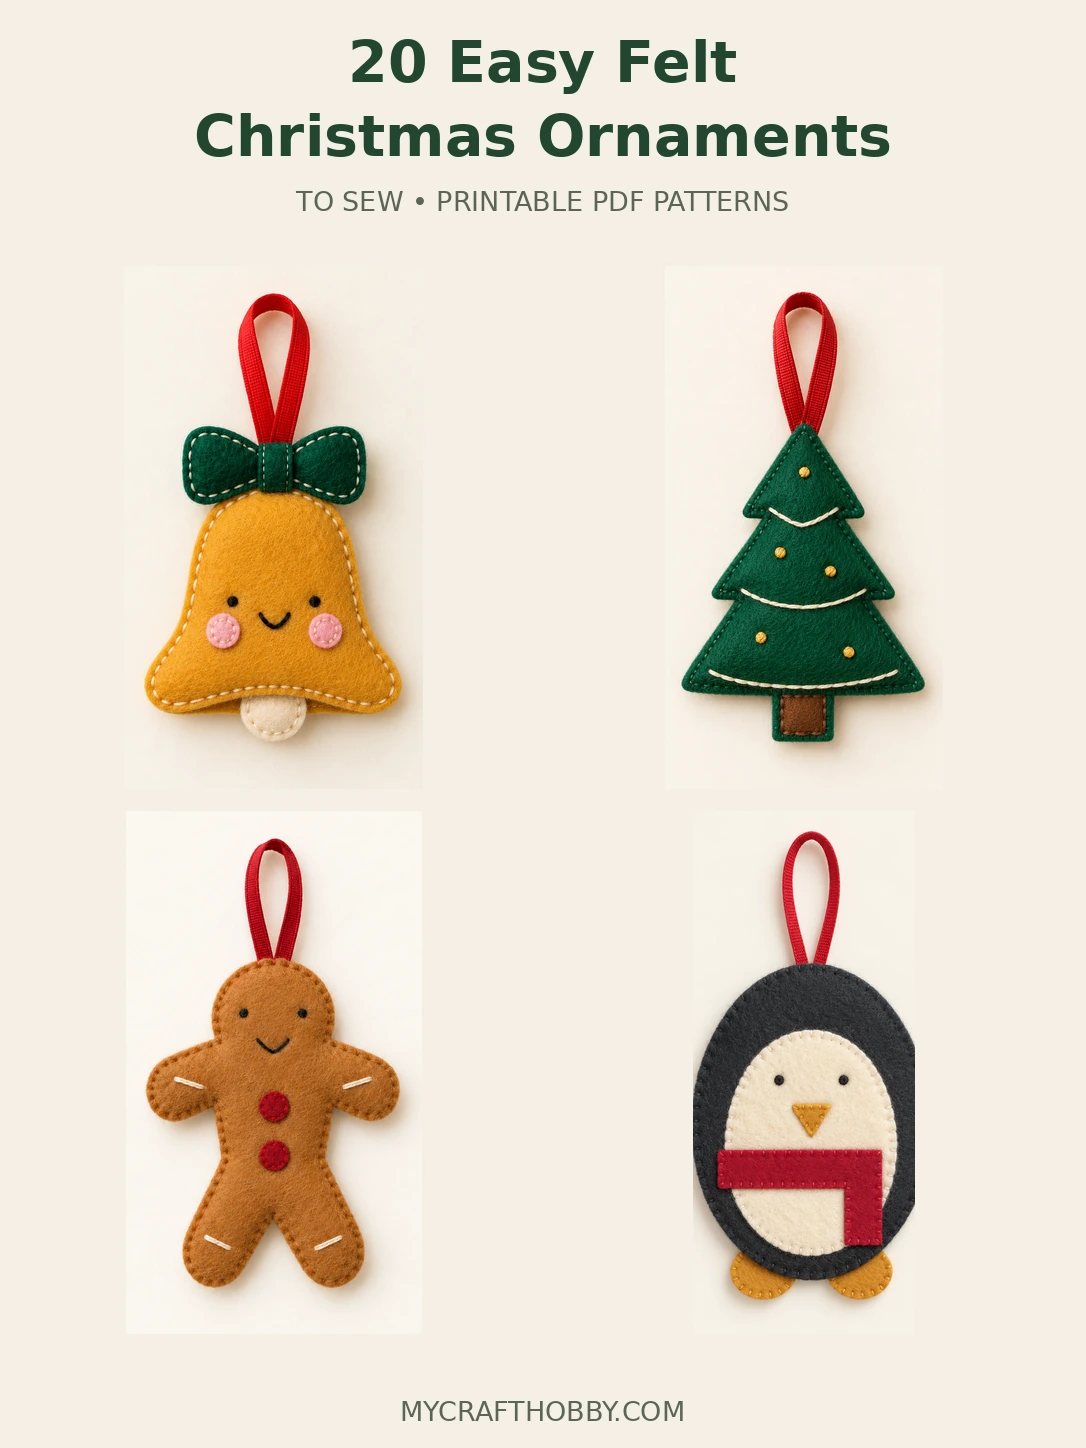
A few scraps of felt, some thread, and a quiet evening can turn into the sweetest little Christmas decorations. These small ornaments are lovely for the tree, a handmade garland, or the finishing touch on a wrapped gift.
I’ve brought together 20 easy felt Christmas ornaments, from simple hearts and stars to cheerful penguins, little houses, and a golden bell. They are all designed for hand sewing, with small felt details and just a little stuffing.
Choose your favorite below and download its three-page PDF. Each file includes a project photo, a measured full-size cutting pattern, and clear assembly instructions, so you can keep everything together at your sewing table.
Supplies for Your Felt Christmas Ornaments
Affiliate disclosure: This post contains Amazon affiliate links. If you buy through these links, I may earn a commission at no extra cost to you. As an Amazon Associate I earn from qualifying purchases.
- Soft craft felt or wool-blend felt, about 1–1.5 mm thick, in your chosen colors. Small scraps are useful for cheeks, noses, berries, and other details.
- Matching sewing thread and embroidery floss in cream, black, and festive colors.
- Hand-sewing embroidery needles and small detail scissors for the little curves.
- A small amount of polyester fiberfill. Most of these ornaments look best with only a thin layer inside.
- Narrow ribbon for hanging: 16 cm per ornament, or 22 cm for the candle, which needs longer anchoring tails.
- A ruler, paper scissors, pins or small clips, and a removable fabric marker tested on a scrap first.
How to Print and Use the Patterns
Print the PDF on A4 paper at 100% or Actual Size. Turn off “Fit to Page” and “Shrink.” Measure the 5 × 5 cm test square before cutting any felt. The images in this post are previews, so use the PDF rather than printing a screenshot.
Every unique felt piece is drawn once. The ×1, ×2, or ×3 label tells you how many to cut. Cut on the solid outline without adding extra seam allowance. Stitch about 2 mm inside the edge, and attach the flat details before joining the front and back.
The listed sizes are approximate sewn sizes, shown as width × height and excluding the ribbon loop. Light stuffing and your choice of felt can change the finished size a little. If you are new to felt sewing, start with the heart or star and try the wreath after you feel comfortable stitching around curves.
Download all 20 ornament patterns in one PDF
The complete bundle has 60 pages. To save paper, print only page 2 of an individual pattern, or pages 2, 5, 8, and every third page after that in the bundle.
1. Felt Christmas Bell
A golden bell with a deep green bow brings a lovely traditional touch to a tree. The little cream clapper is made from felt, so there is no metal bell to find.
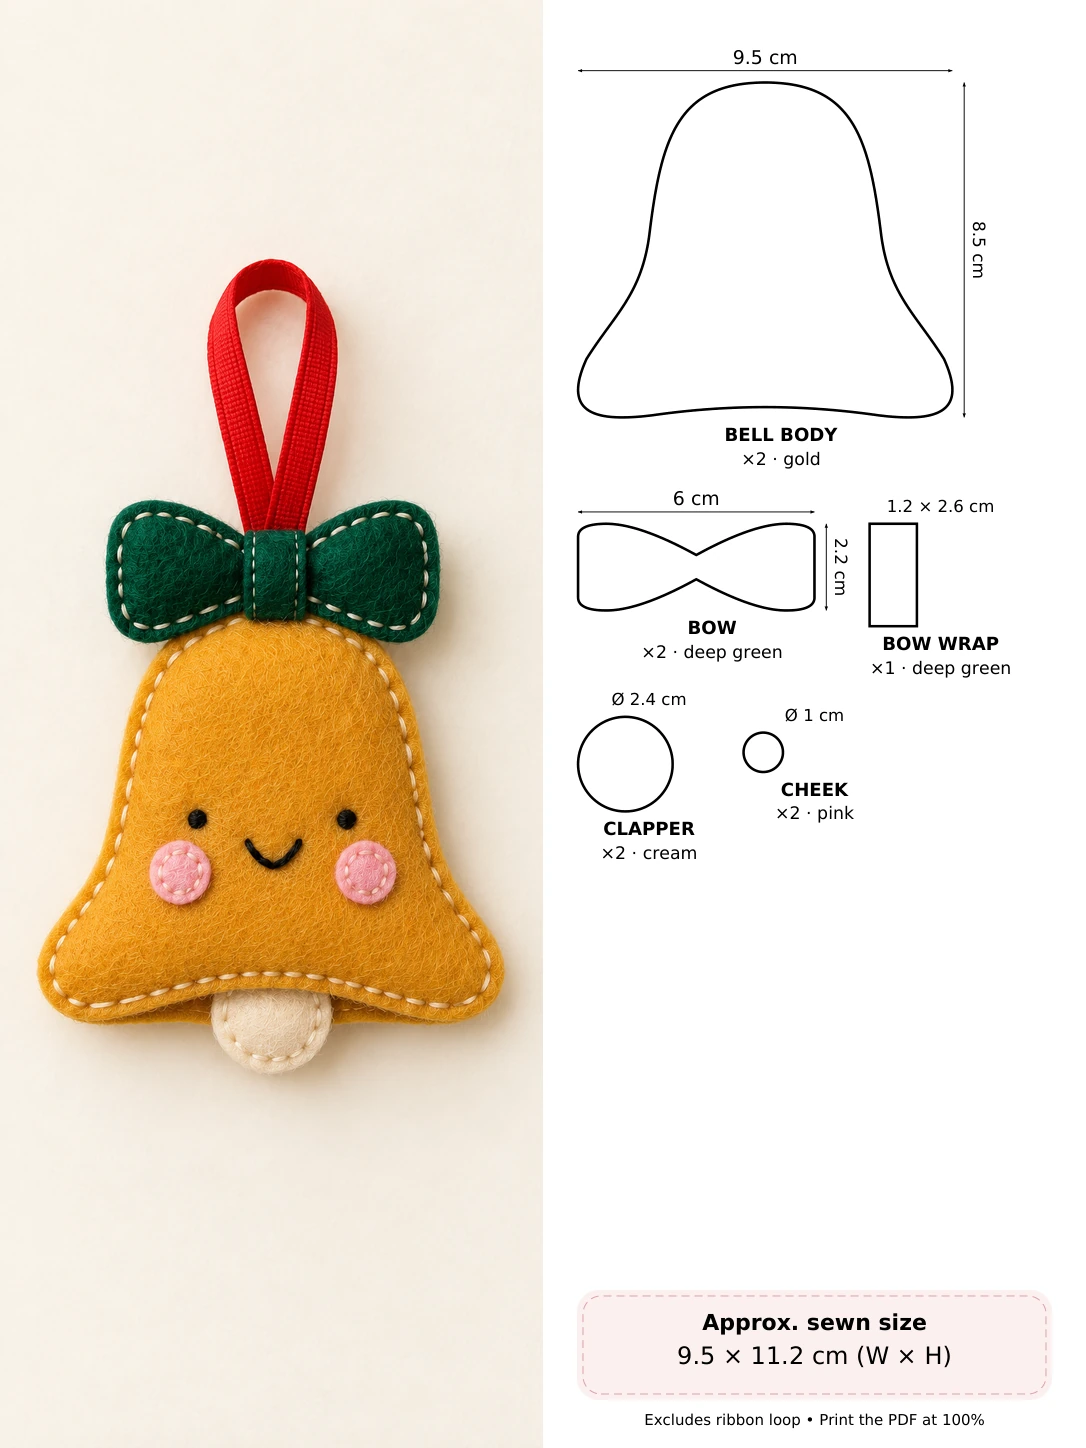
How it comes together: Sew the little face, make the flat clapper, and join the bell layers. Finish by stitching the separate bow onto the top.
Little sewing tip: Keep the clapper flat so it hangs neatly beneath the bell.
2. Smiling Felt Star
This cheerful star needs just one main shape and two tiny cheeks. Gold, cream or soft pink felt all work beautifully with a simple stitched face.
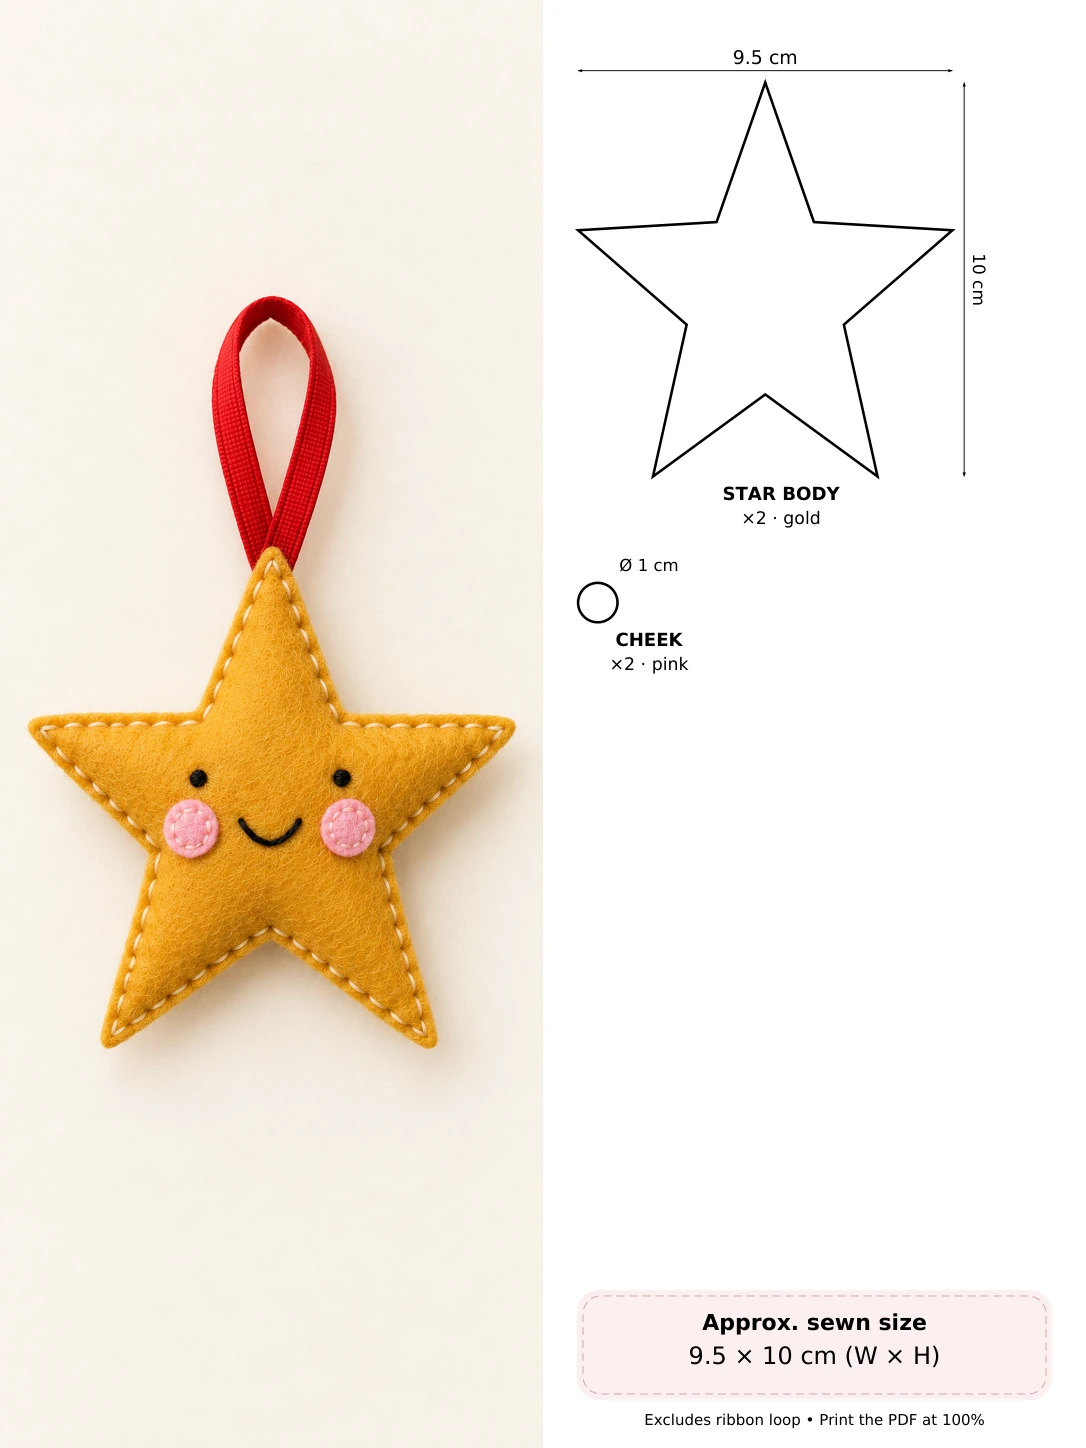
How it comes together: Add the cheeks and stitched face, then blanket-stitch the two stars around a small amount of filling.
Little sewing tip: Use tiny stitches around the points and avoid packing them tightly.
3. Scandinavian Felt Heart
A deep red heart with cream embroidery feels wonderfully cozy. With only two felt pieces to cut, it is a calm little project for a quiet evening.
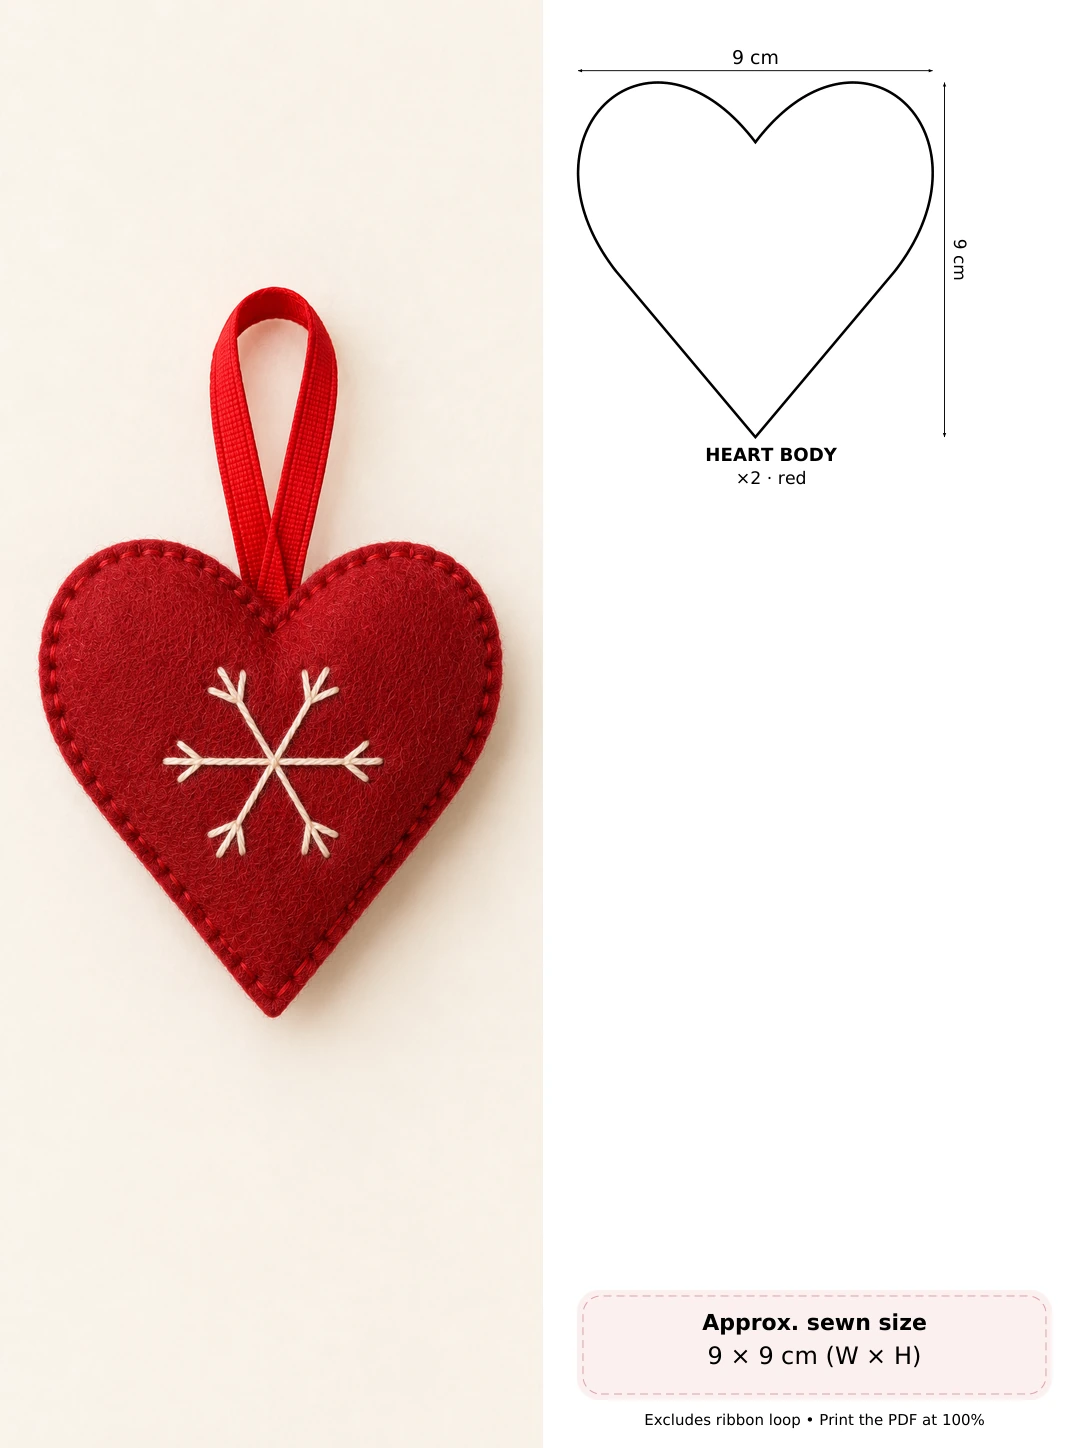
How it comes together: Embroider the snowflake first, then join the heart layers and catch the ribbon loop in the top cleft.
Little sewing tip: Try the embroidery on a scrap before stitching the ornament.
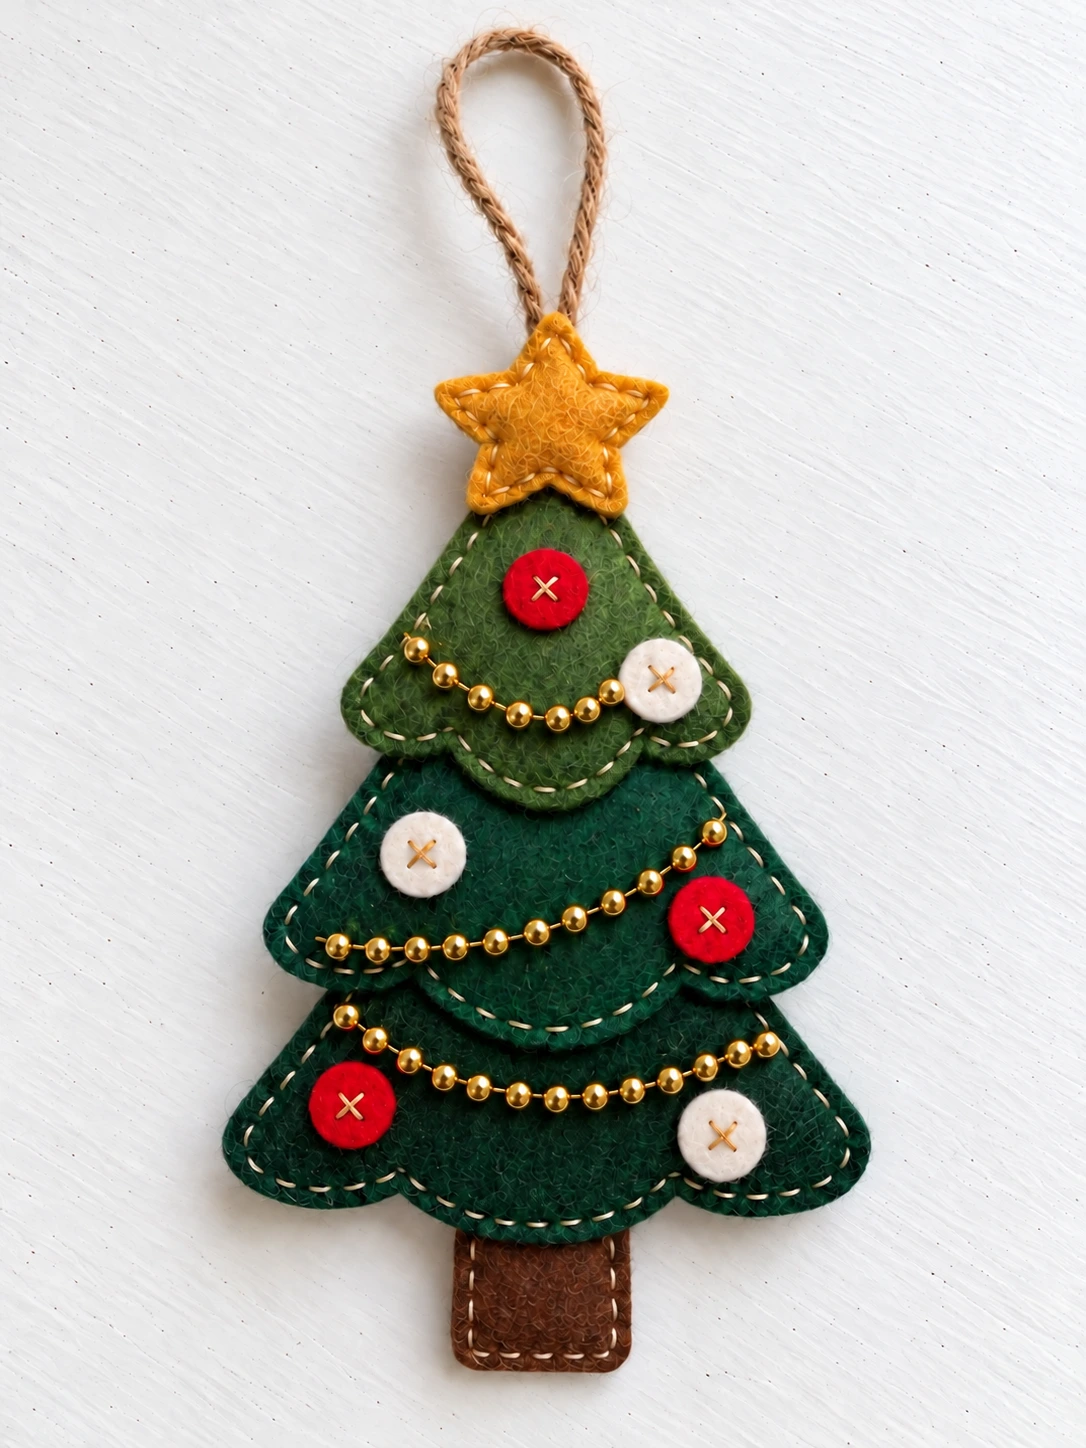
4. Little Felt Christmas Tree
This simple tiered tree is a lovely way to use dark green felt scraps. The garland and ornaments are stitched directly onto the front, keeping the cutting easy.
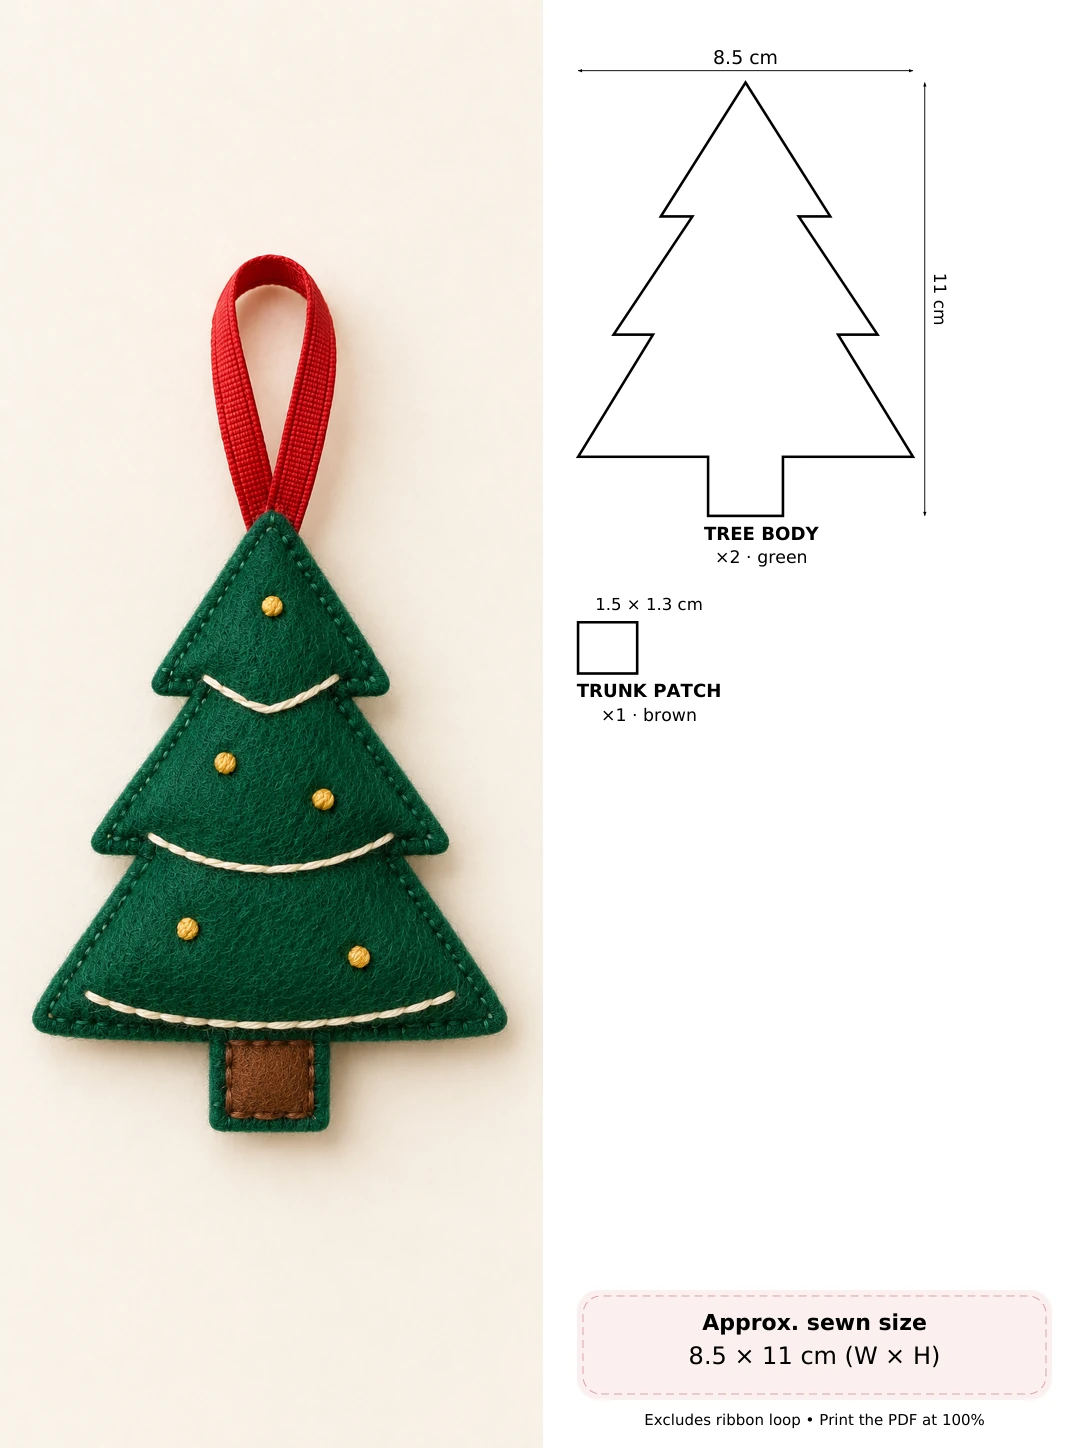
How it comes together: Sew the trunk patch and embroidered garlands before joining the two tree shapes. Keep the branch points lightly filled.
Little sewing tip: Do the embroidery before joining the two tree layers.
5. Mini Felt Stocking
A tiny red stocking is a classic Christmas shape and a sweet place for a cream heart. Its broad toe is easier to sew than a narrow, sharply curved stocking.
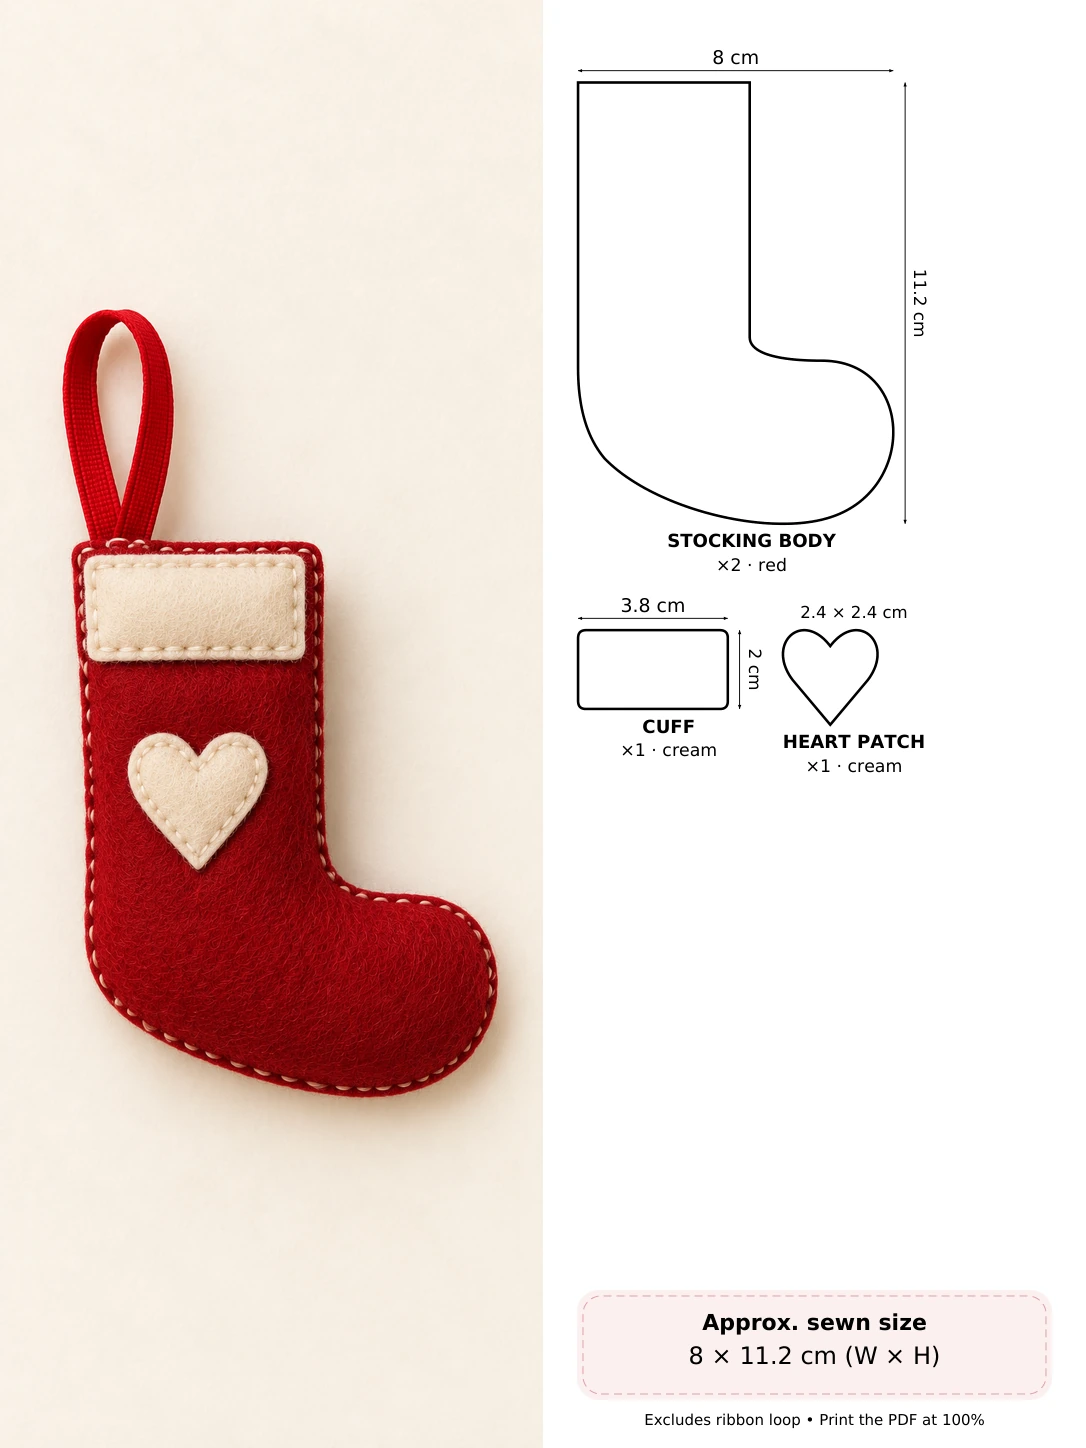
How it comes together: Add the cream cuff and heart, then stitch all the way around the stocking. The top is closed on this decorative version.
Little sewing tip: Use only a pinch of filling in the toe so the outline stays clear.
6. Snowflake Felt Mitten
A soft blue mitten looks lovely beside white or silver decorations. The thumb is part of the main shape, so there are no little separate pieces to attach.
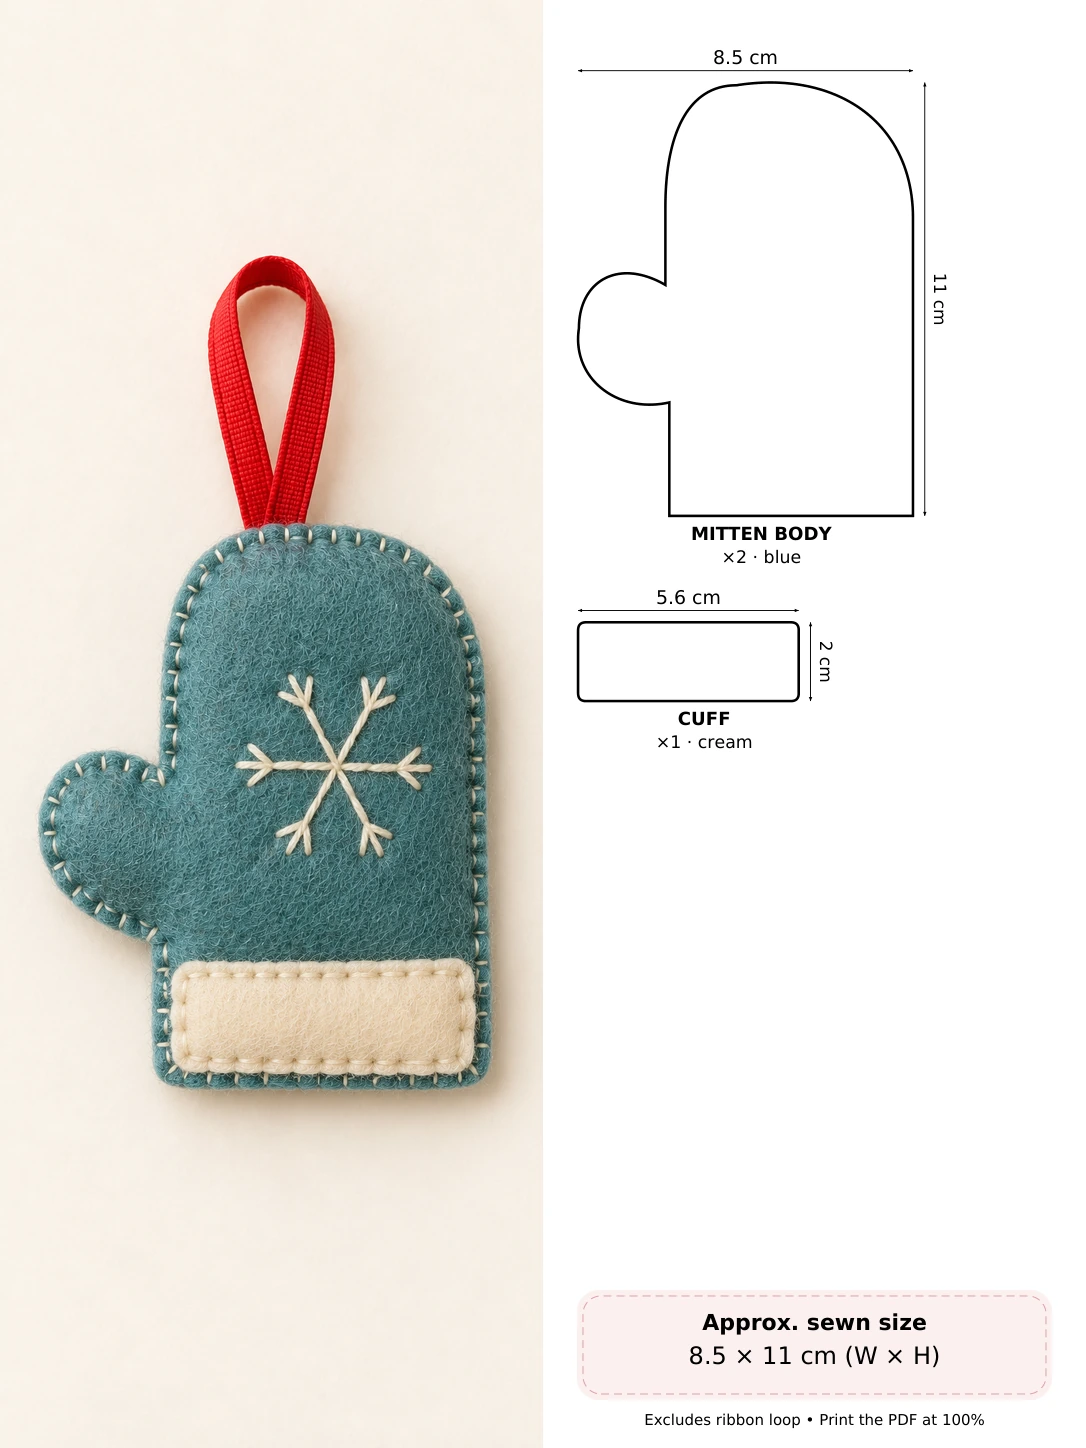
How it comes together: Sew on the cuff, embroider the snowflake, and join the mitten layers. Take smaller stitches around the thumb curve.
Little sewing tip: Keep the stitches short in the curve where the thumb meets the palm.
7. Striped Felt Candy Cane
Three bold red stripes give this cream candy cane its festive finish. The open hook makes it instantly recognizable without needing lots of small curved appliques.
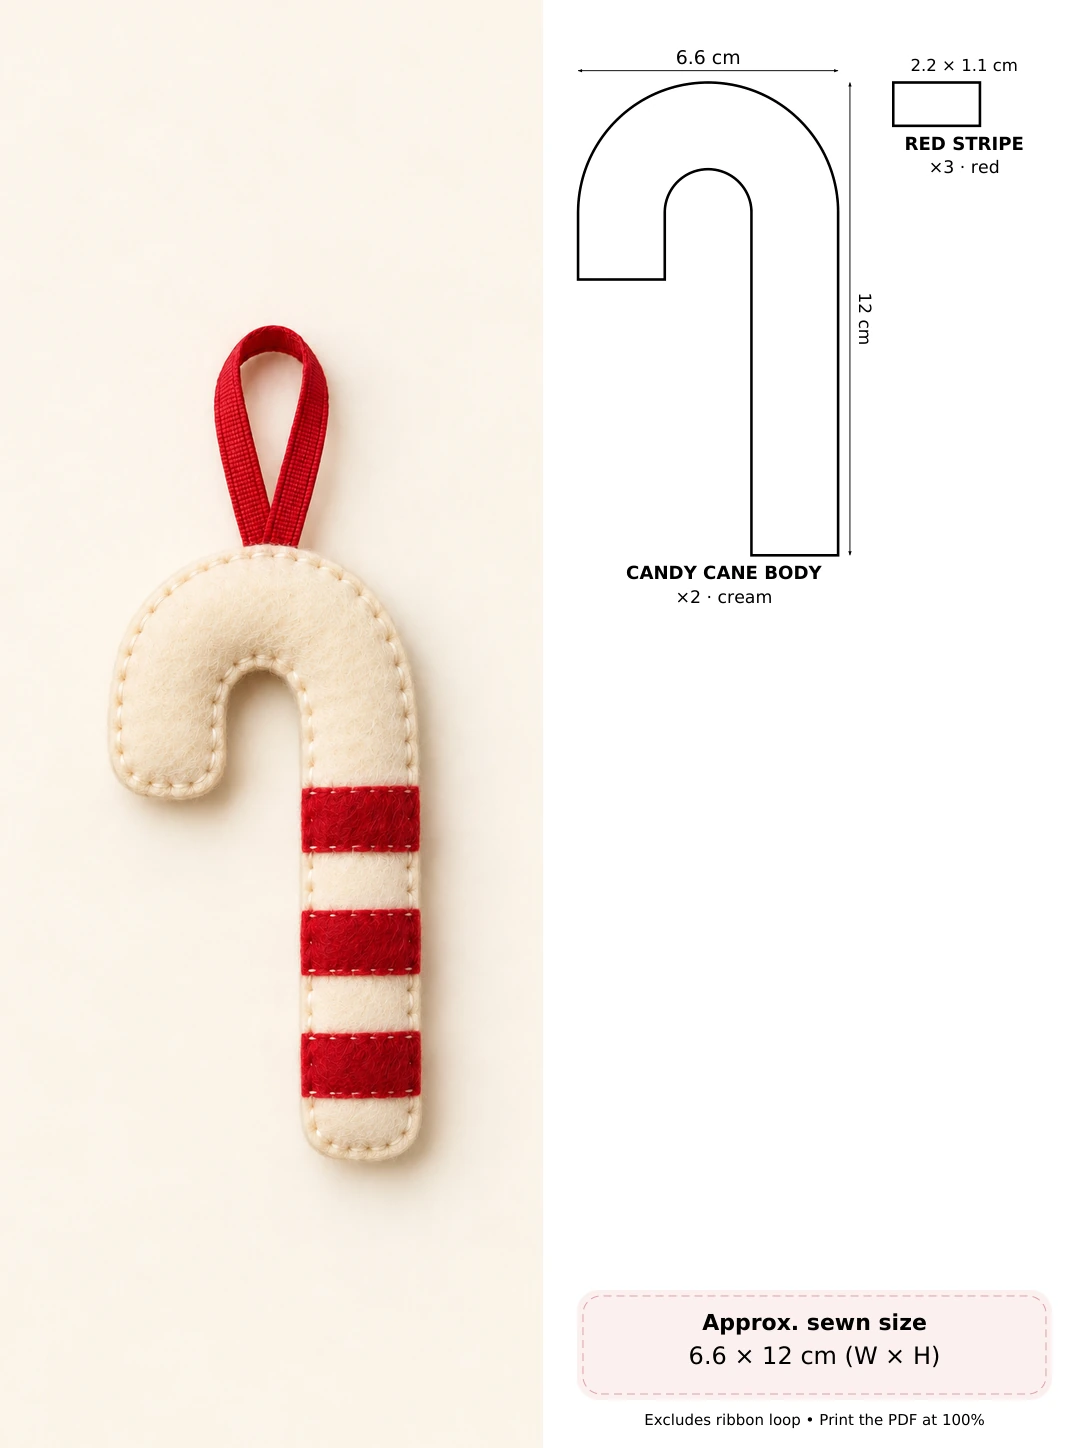
How it comes together: Attach the three red stem stripes first. Sew around the outer and inner curves, then leave flat or add very light filling.
Little sewing tip: Flat or very lightly filled is best for the narrow stem.
8. Felt Gingerbread Person
This friendly gingerbread ornament has stitched icing and soft felt buttons. The rounded arms and legs help it feel approachable for a first small stuffed project.
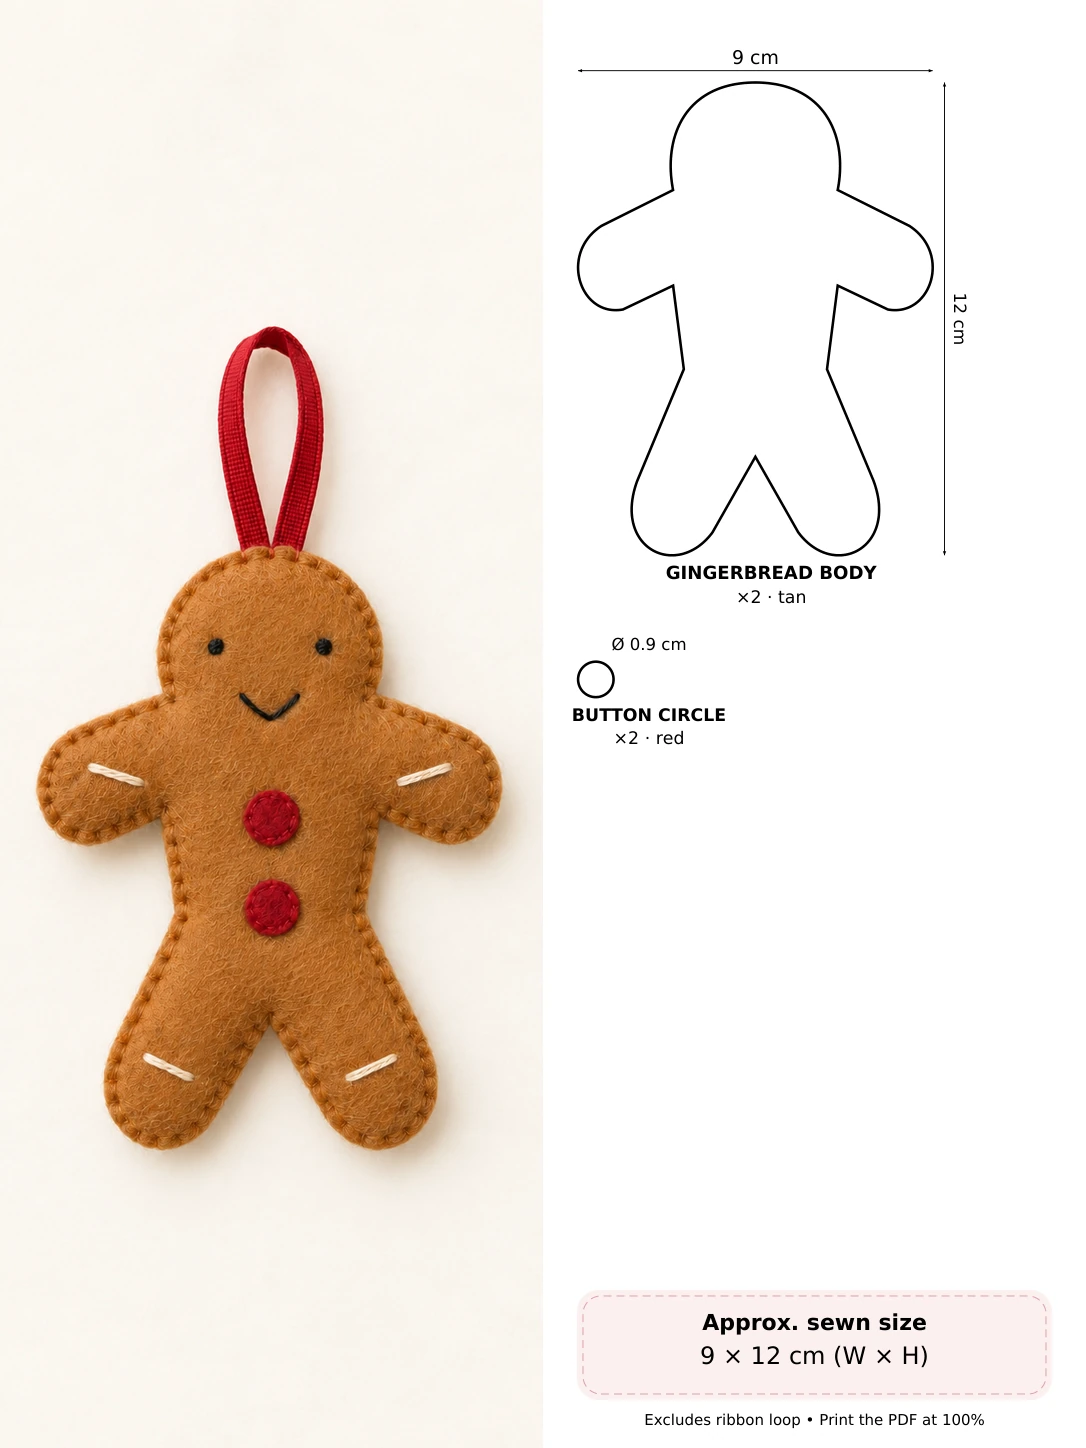
How it comes together: Embroider the face and icing lines, sew on the felt buttons, and join the body layers before filling the arms and legs lightly.
Little sewing tip: Do not cut extra felt icing strips: the cream details are simple embroidery.
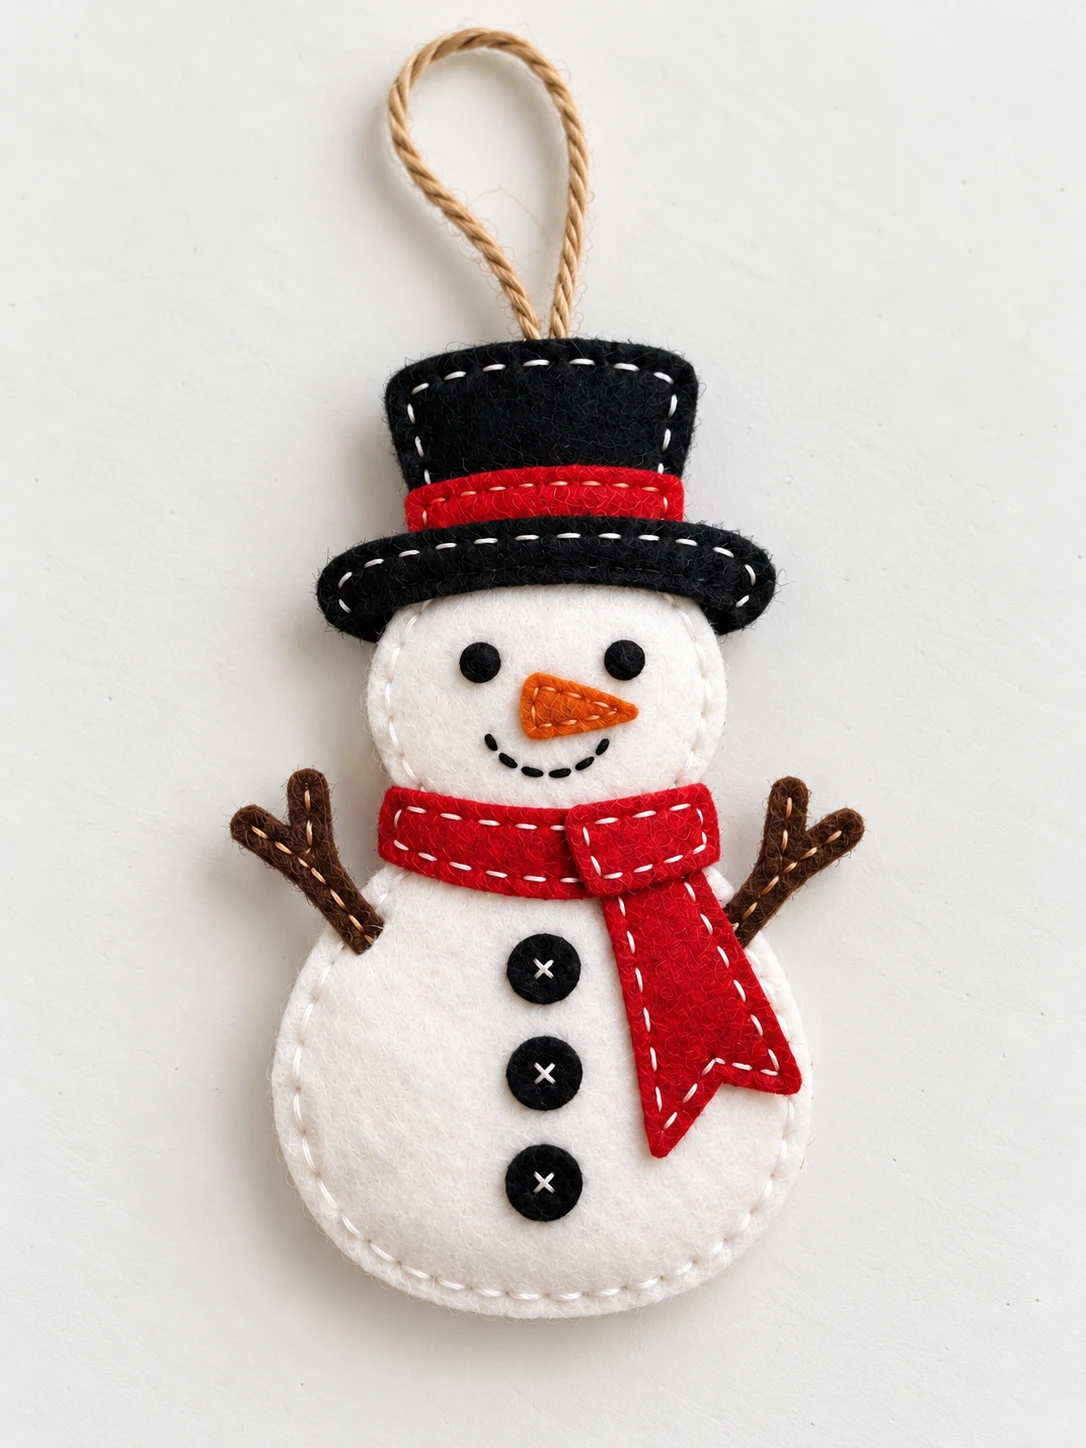
9. Cozy Felt Snowman
A rosy scarf gives this simple snowman a cozy finish. The head and body are one joined outline, which saves sewing separate snowballs together.
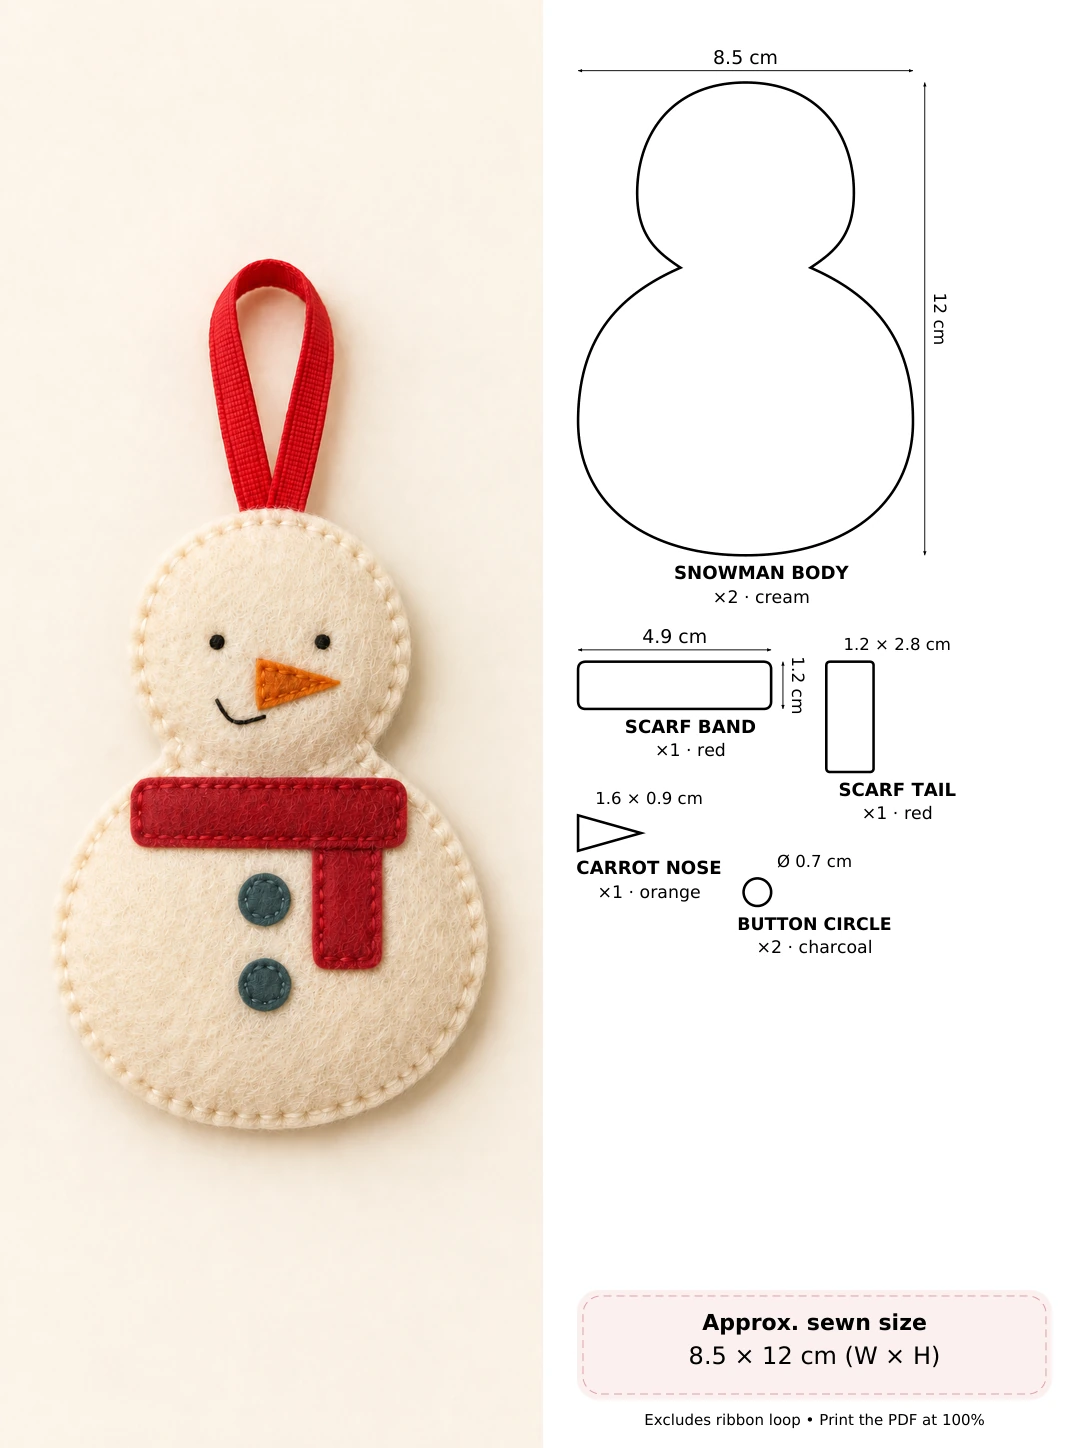
How it comes together: Add the nose and buttons, stitch the scarf tail beneath its band, and then sew the front and back together.
Little sewing tip: Sew the scarf tail before the band so the join is tucked away.
10. Little Felt Santa Hat
A bright red hat with a cream brim is a small classic that is easy to recognize from across the room. The pom-pom is a stitched felt circle, so no yarn pom-pom maker is needed.
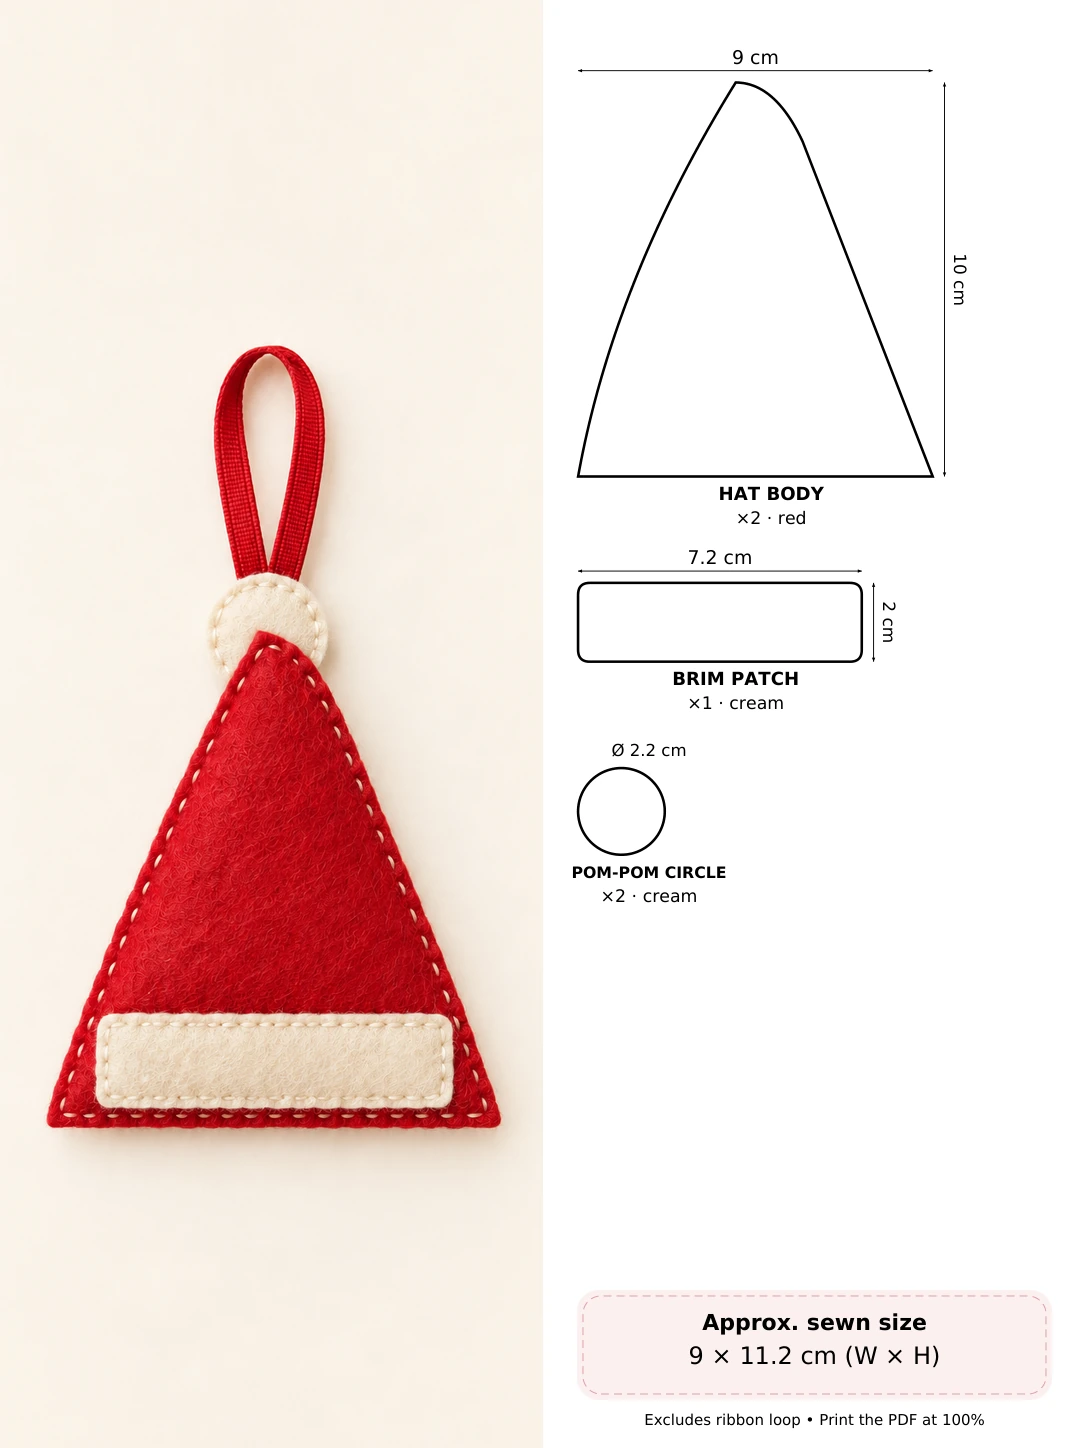
How it comes together: Sew the flat pom-pom, attach it behind the red tip, and add the cream brim. Join the hat layers with the ribbon firmly anchored.
Little sewing tip: Keep the pom-pom flat and secure its hidden overlap before sewing the hat shut.
11. Embroidered Felt Bauble
A flat felt bauble gives you the look of a traditional ornament without using glass. Try burgundy and gold or swap in colors that match your tree.
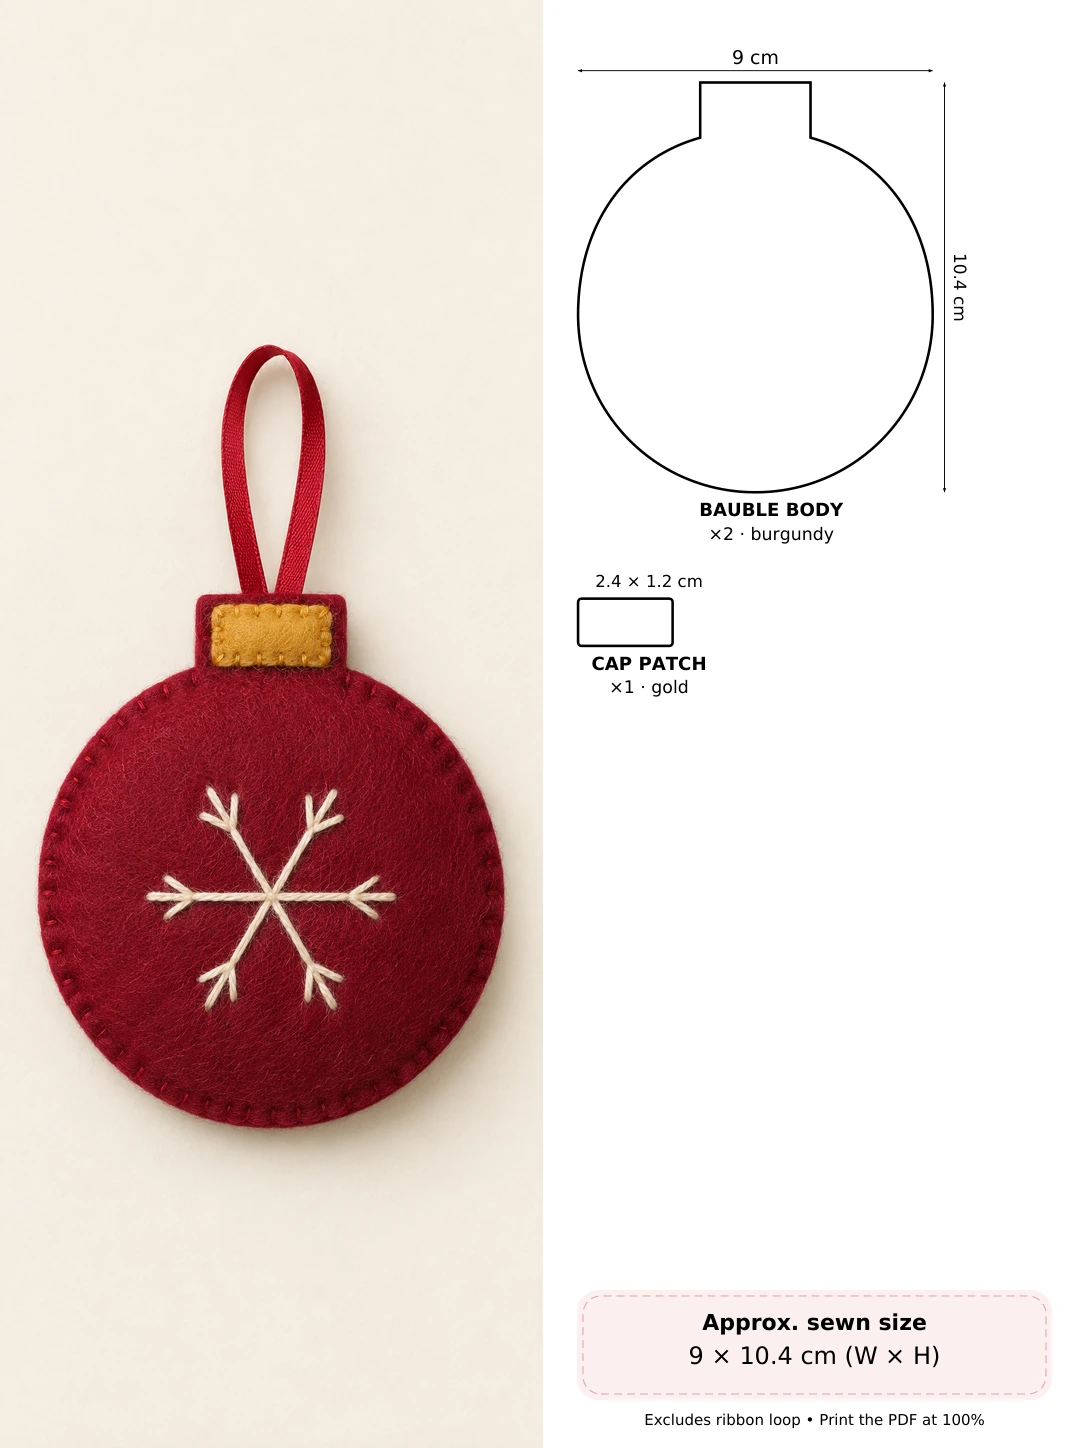
How it comes together: Embroider a snowflake on the round front, add the little gold cap, and sew the main layers together around a thin layer of filling.
Little sewing tip: Leave the little top cap almost flat so it keeps its shape.
12. Red-Breasted Felt Robin
A little robin looks right at home among Christmas greenery. Its red breast and dark wings are simple oval appliques on one rounded body.
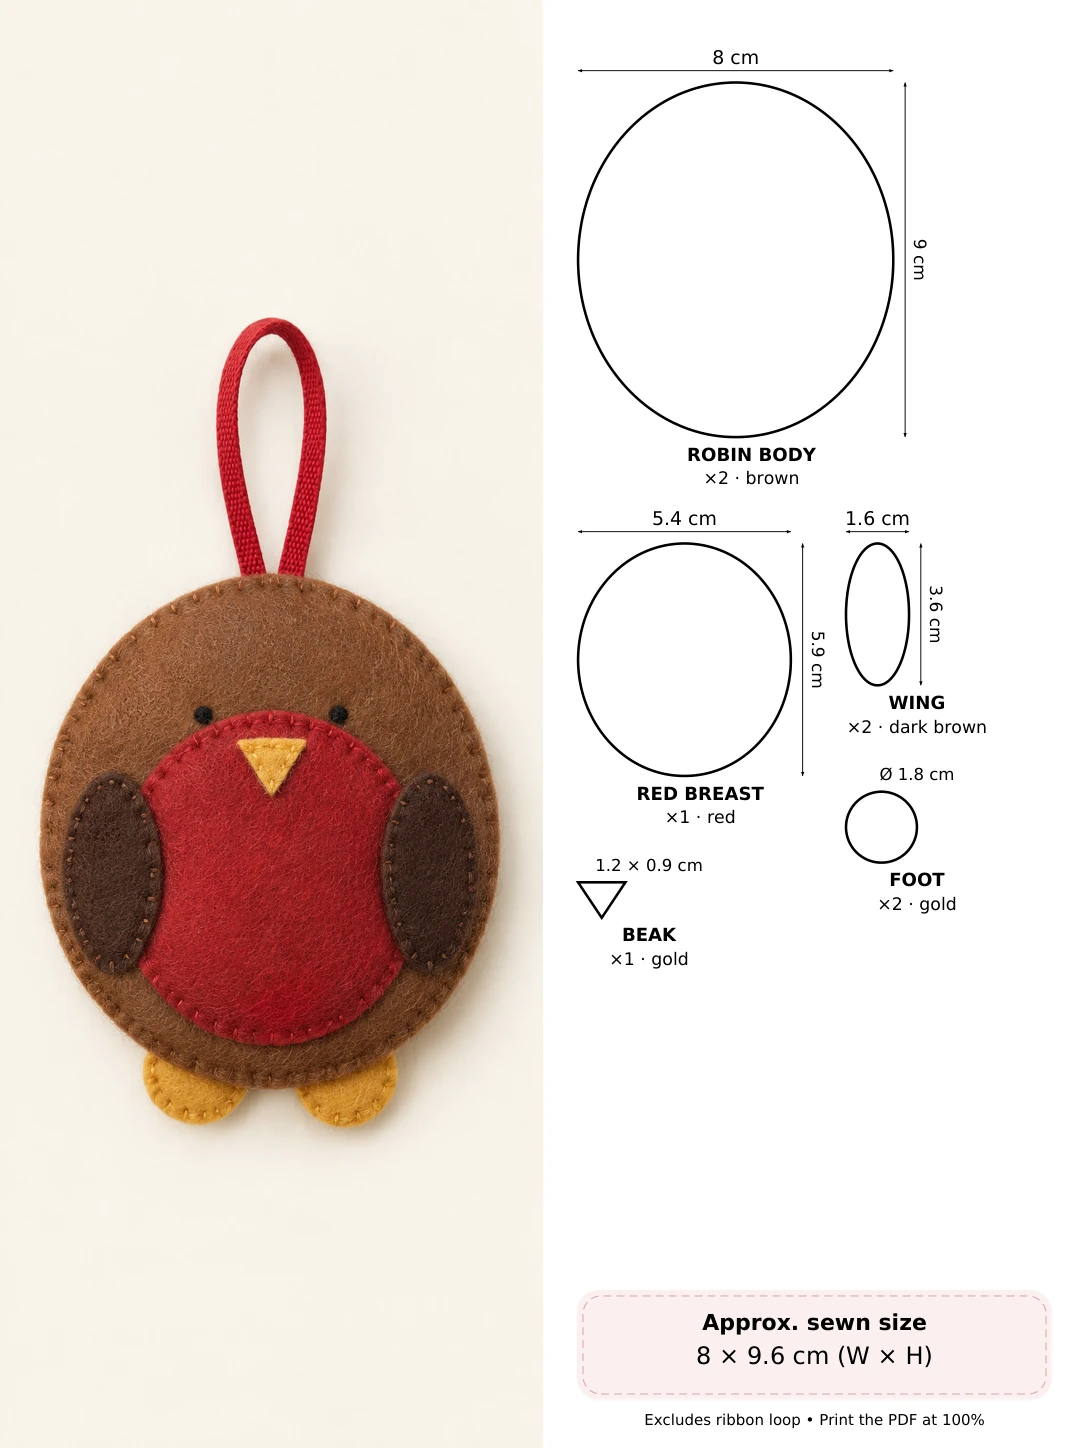
How it comes together: Applique the breast, wings and beak. Secure the feet behind the body before joining the front and back.
Little sewing tip: Stitch the breast before the wings so the side layers sit neatly.
13. Peaceful Felt Dove
This side-facing dove is a gentle addition to a woodland or cream-colored tree. A tiny red heart on its wing adds just enough color.
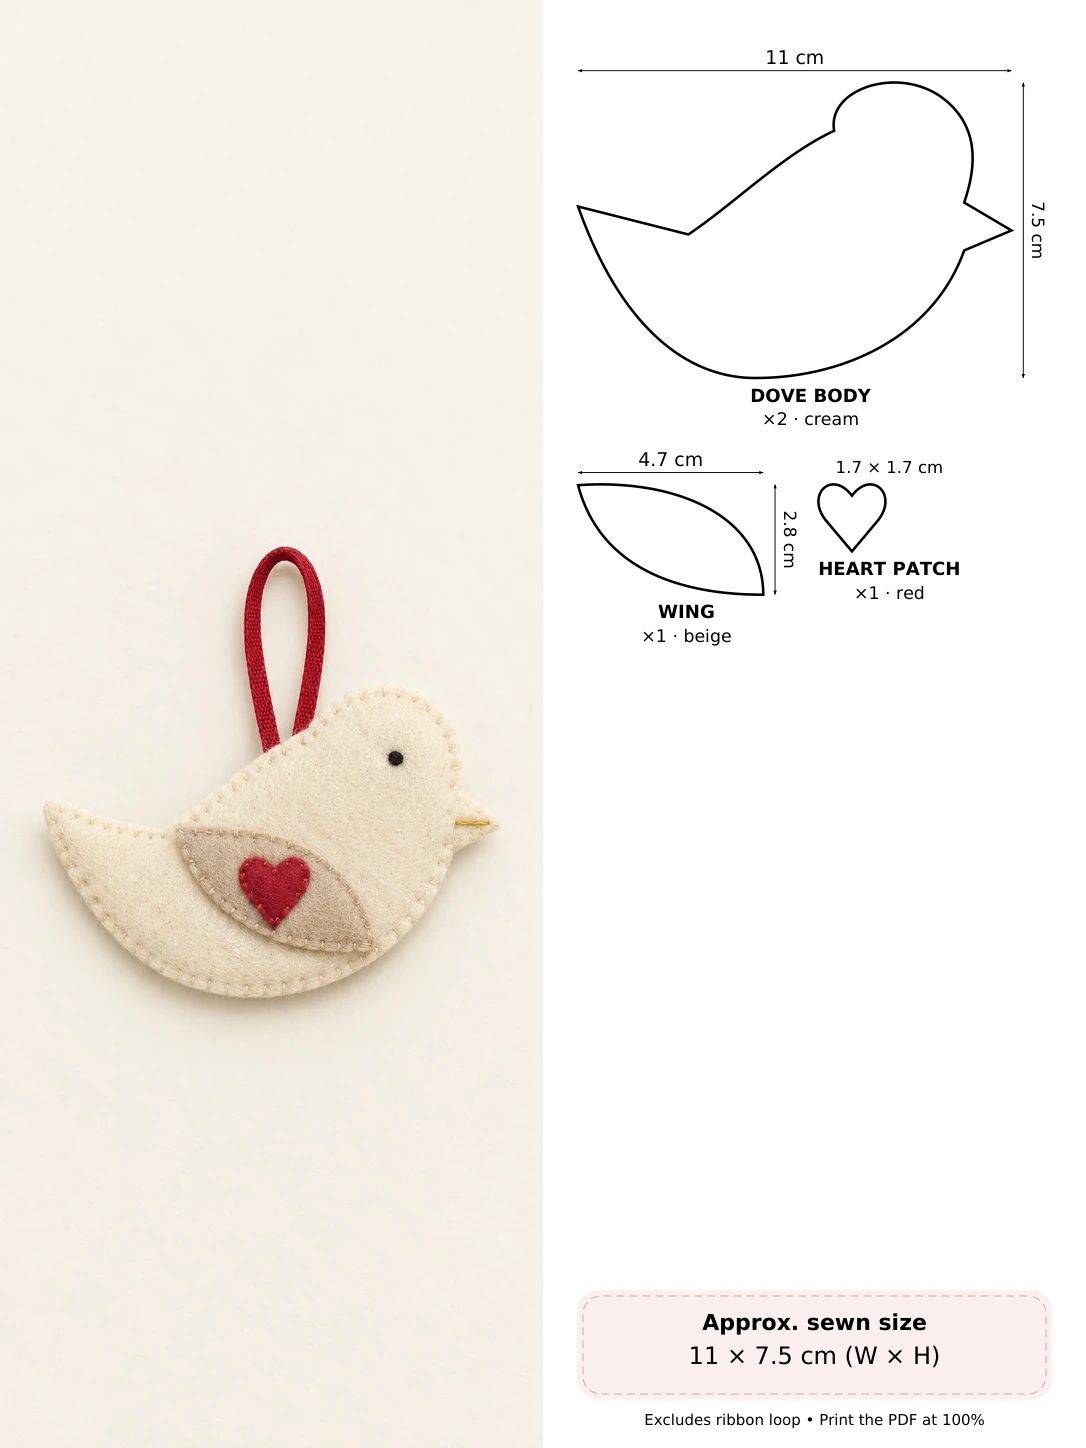
How it comes together: Sew the wing and tiny heart onto the front, embroider the eye, and add the loop over the bird’s balance point before closing.
Little sewing tip: Anchor the loop over the center of the body so the bird hangs level.
14. Scarf-Wearing Felt Penguin
This round little penguin gets a festive touch from a red scarf. The scarf is cut as one L-shaped piece, making it easier than joining separate narrow strips.
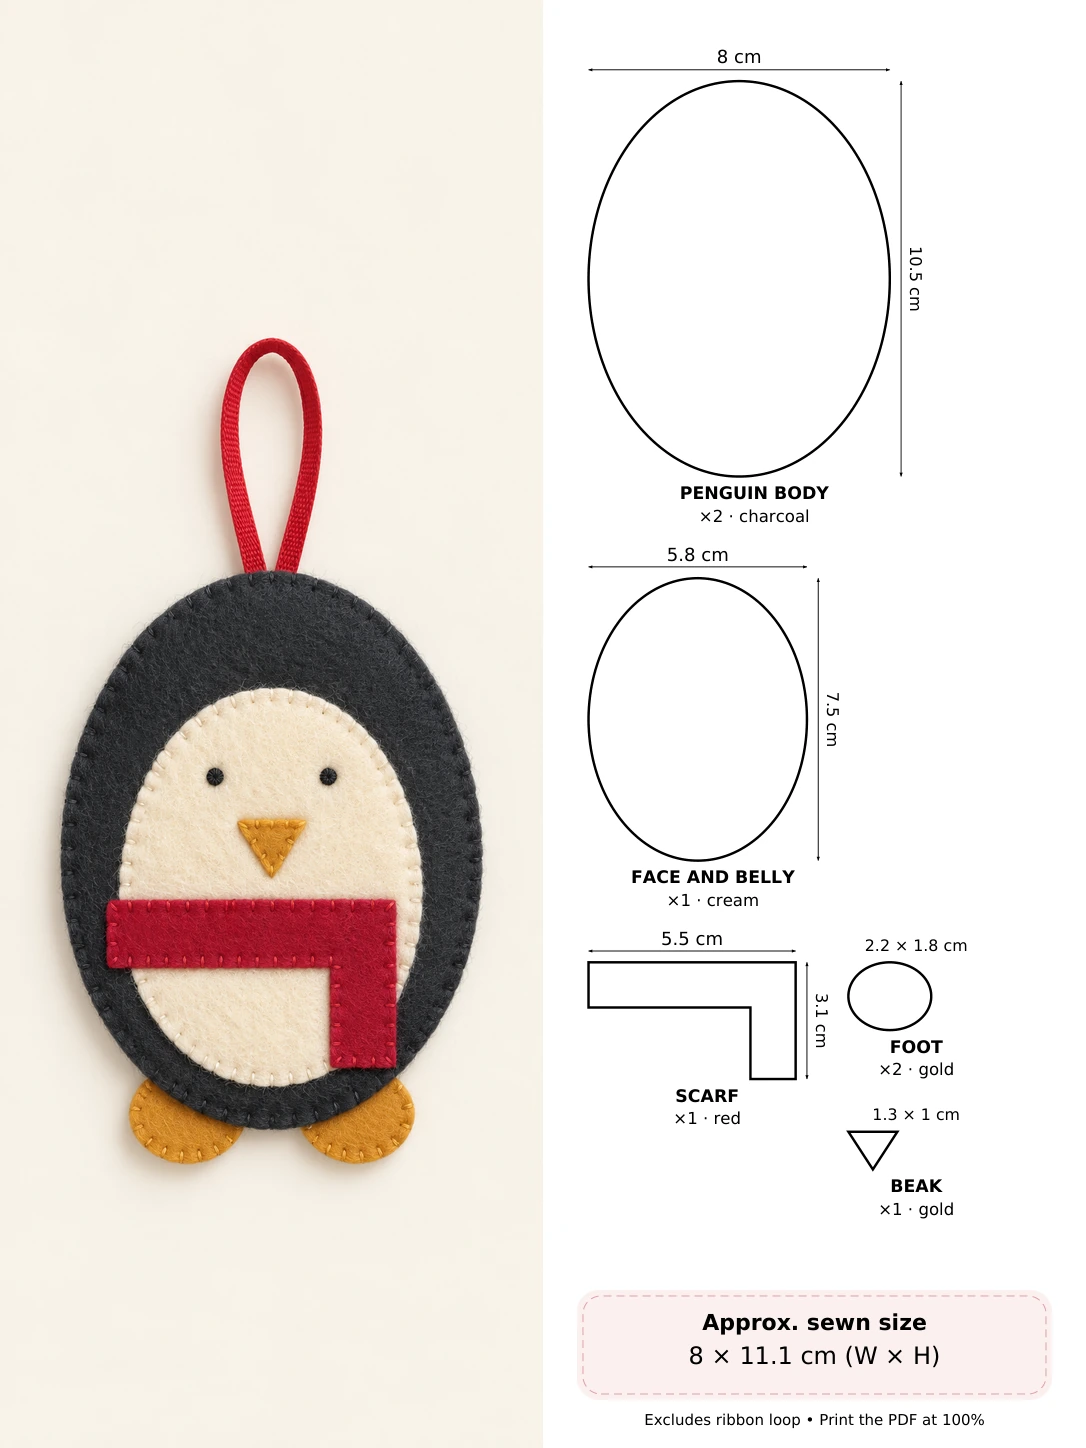
How it comes together: Add the pale face-and-belly panel, beak and one-piece scarf. Baste the feet into position before sewing the body layers together.
Little sewing tip: Keep the pale belly centered before you begin stitching.
15. Simple Felt Christmas Gnome
A tall green hat and soft cream beard make this gnome instantly festive. The main backing is a single shape, so there are no separate arms or legs to sew.
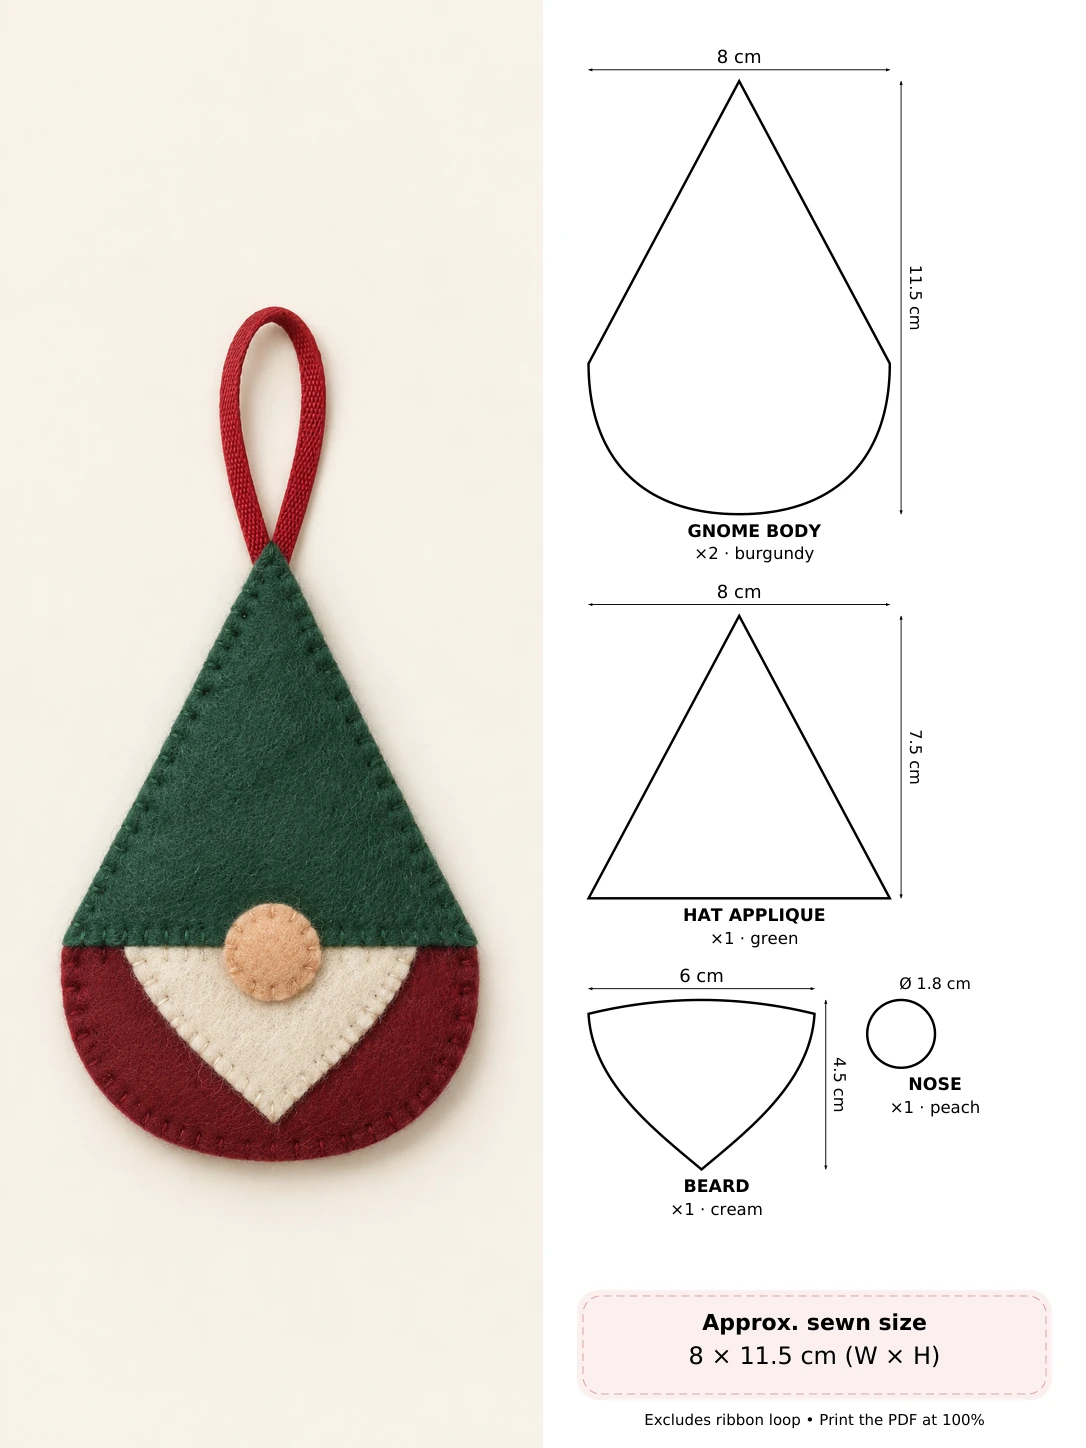
How it comes together: Sew the beard first, overlap it with the green hat, and add the nose. Join the shaped backing pieces with a little filling inside.
Little sewing tip: Put the beard on before the hat to hide the top edge cleanly.
16. Wrapped Felt Gift
A little wrapped present adds a bright square shape to a collection of felt ornaments. One strip template is used twice, once turned sideways, for the crossed ribbon.
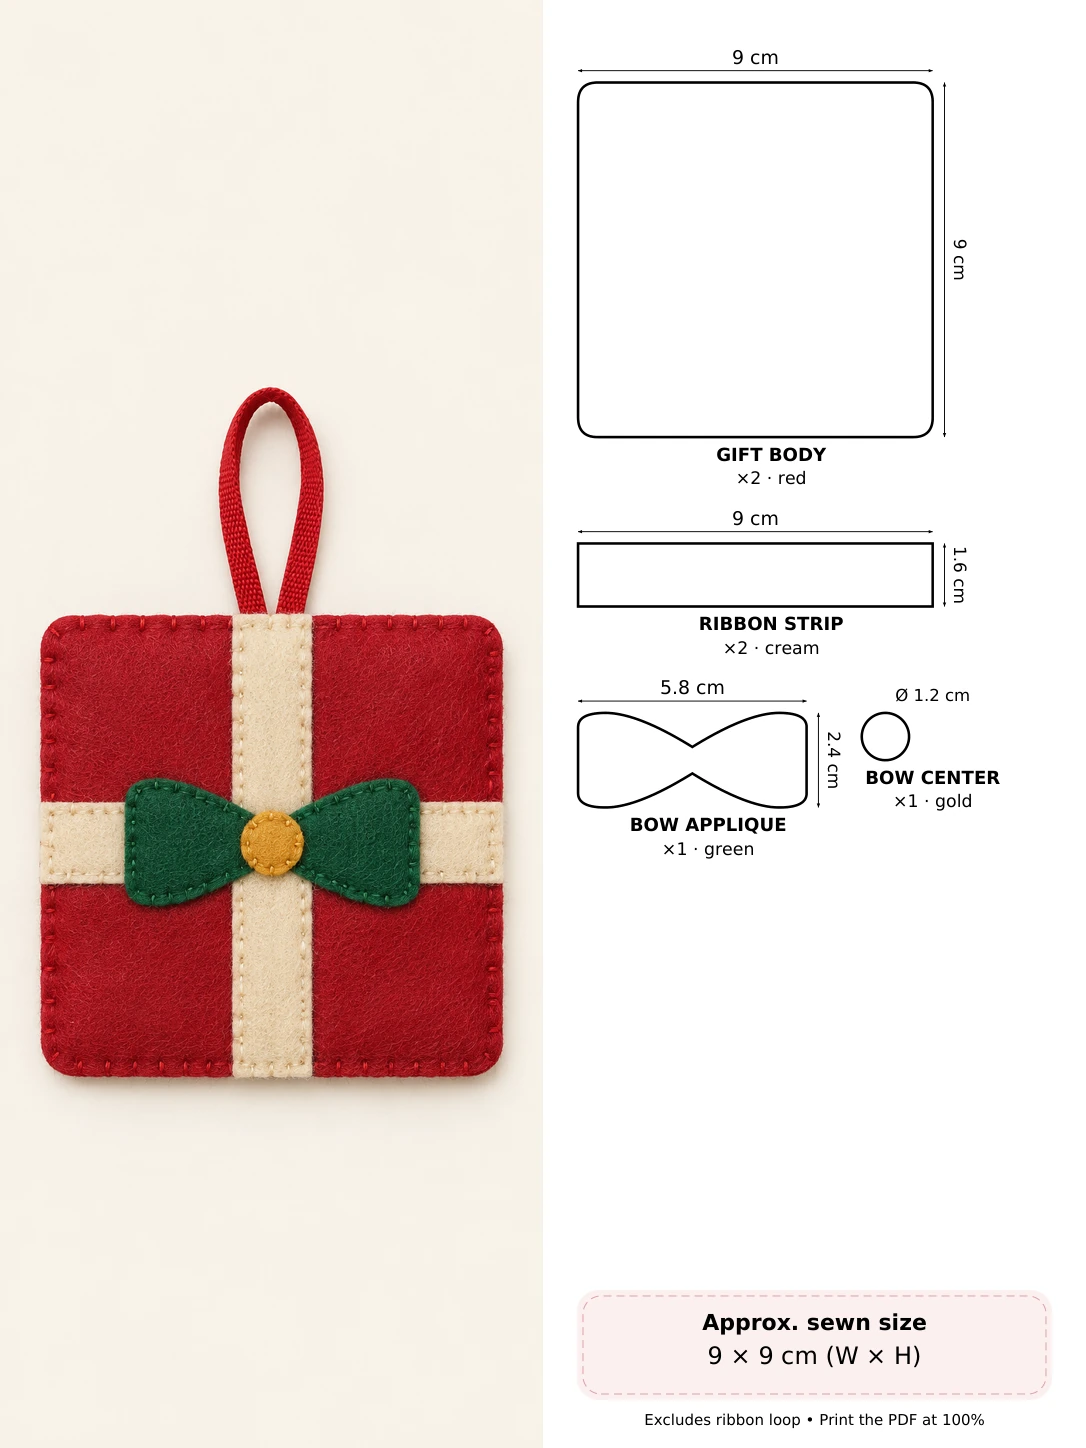
How it comes together: Use the same strip template twice for the crossed ribbon. Add the bow and gold center, then sew the gift layers together.
Little sewing tip: Keep the layers flat at the ribbon crossing so the center does not become bulky.
17. Holly Felt Candle
A warm cream candle with a felt flame adds a lovely old-fashioned detail. It is entirely decorative, with holly leaves and berries stitched onto the front.
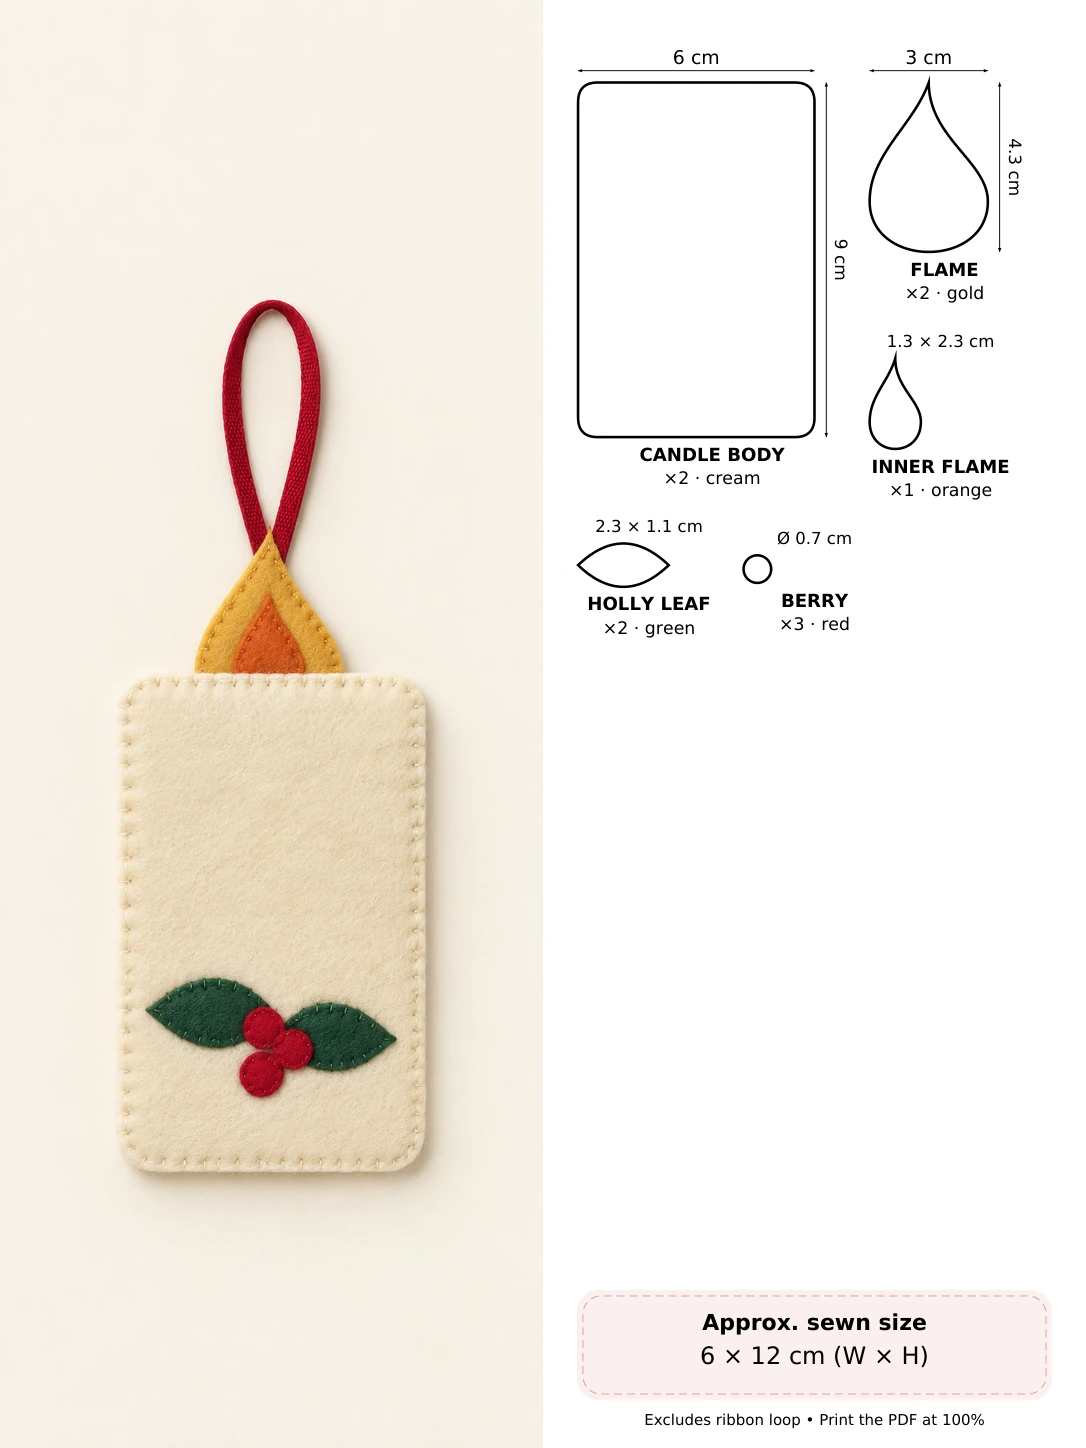
How it comes together: Make the flat flame with its orange center, secure the longer ribbon tails, and tuck the flame into the top of the candle body.
Little sewing tip: Keep the flame flat and use extra securing stitches where it meets the candle.
18. Gingerbread Felt House
This little house has a red roof, two bright windows and a rounded door. It pairs especially well with the gingerbread person for a sweet handmade theme.
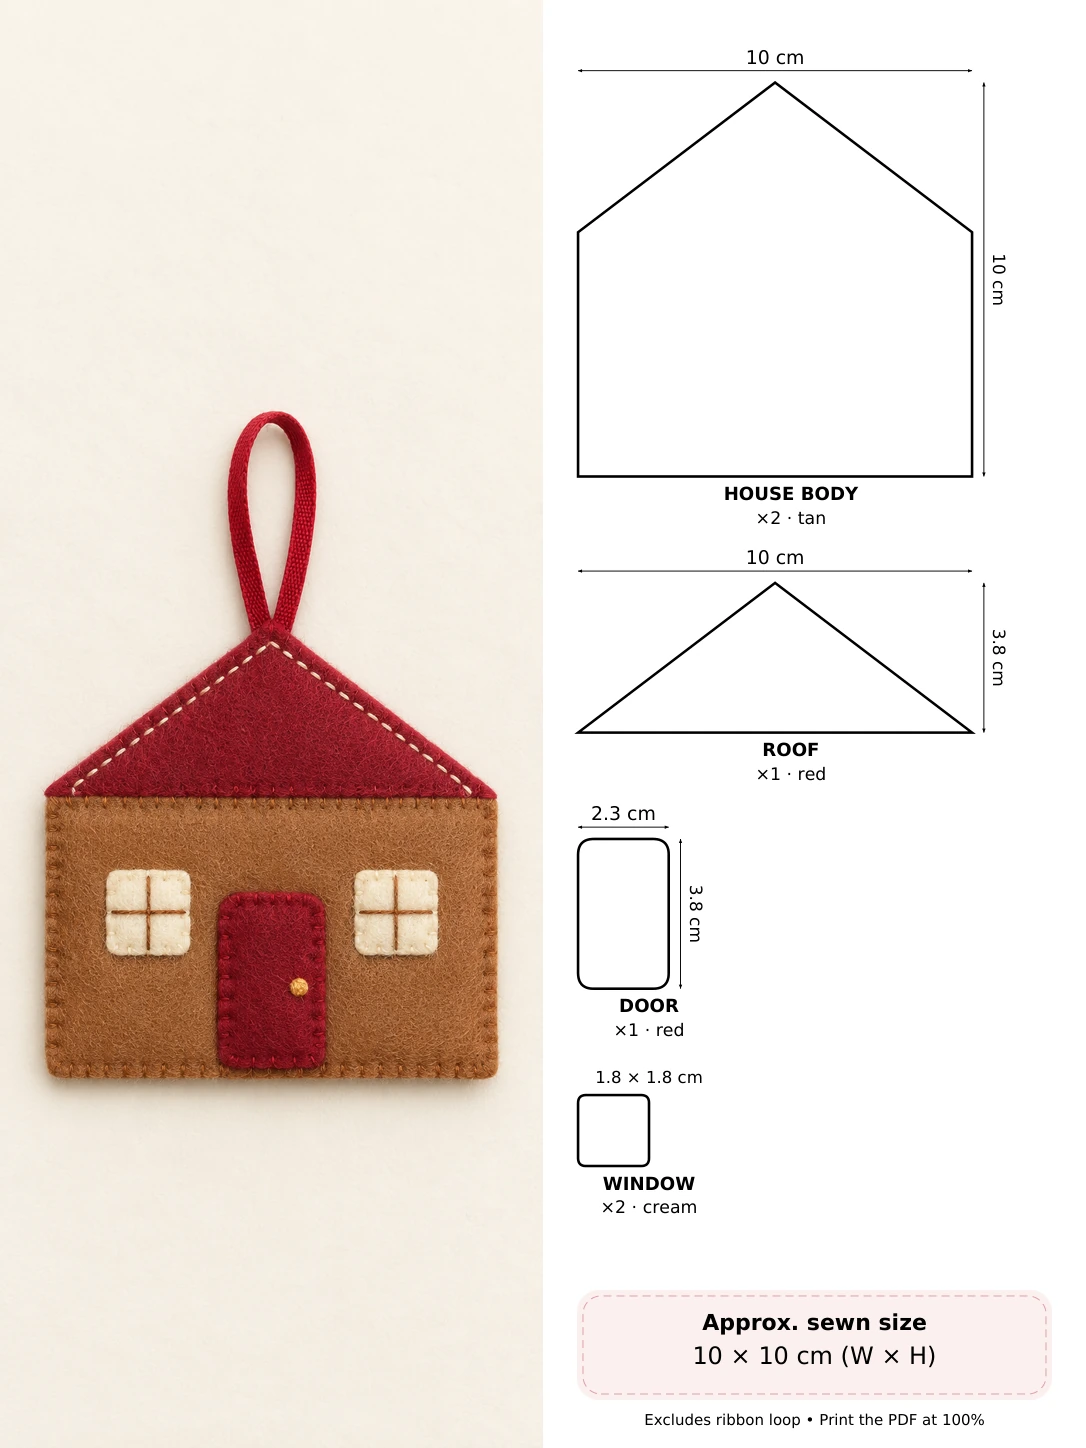
How it comes together: Applique the roof, windows and door, embroider the small details, and then join the two house shapes.
Little sewing tip: Sew the roof and windows before the body layers are joined.
19. Little Felt Wreath
A small felt wreath makes a pretty finishing touch to this collection. The inner edge is sewn first, so the ring is easy to keep aligned as you work.
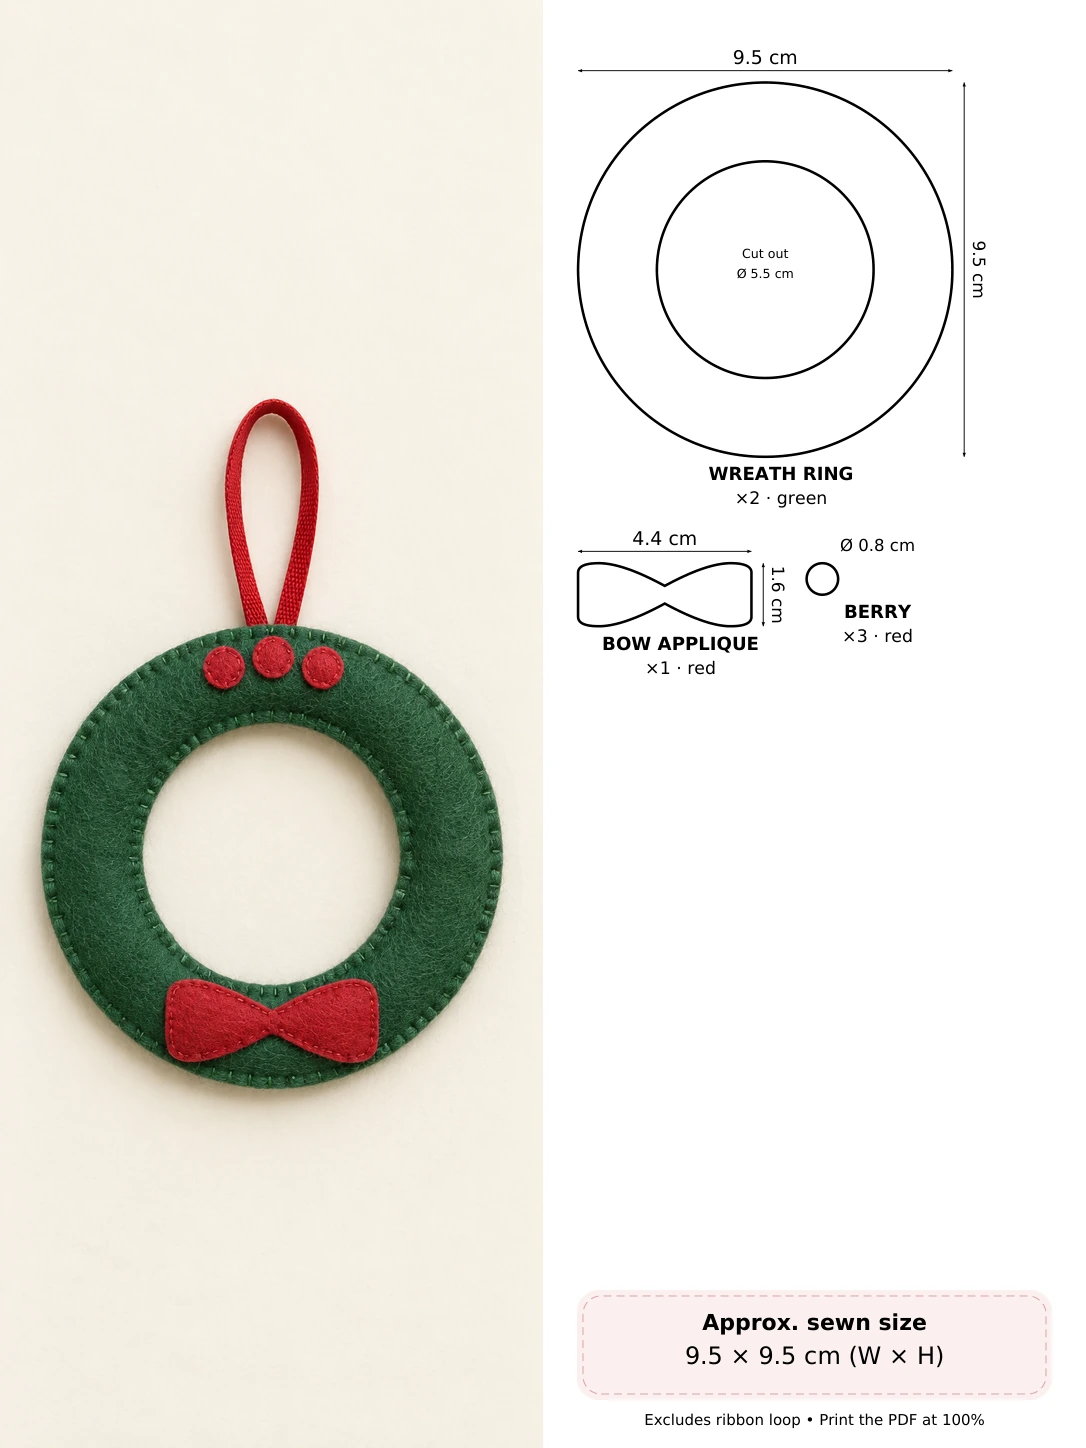
How it comes together: Cut the center holes, add the bow and berries, and stitch the inner edge first. Finish the outer edge with very light filling.
Little sewing tip: This one has an extra inner seam; try it after a heart or star.
20. Felt Christmas Pudding
Cream icing and a little holly turn a rounded brown shape into a festive pudding. It is a lovely project for small red and green scraps left from the other ornaments.
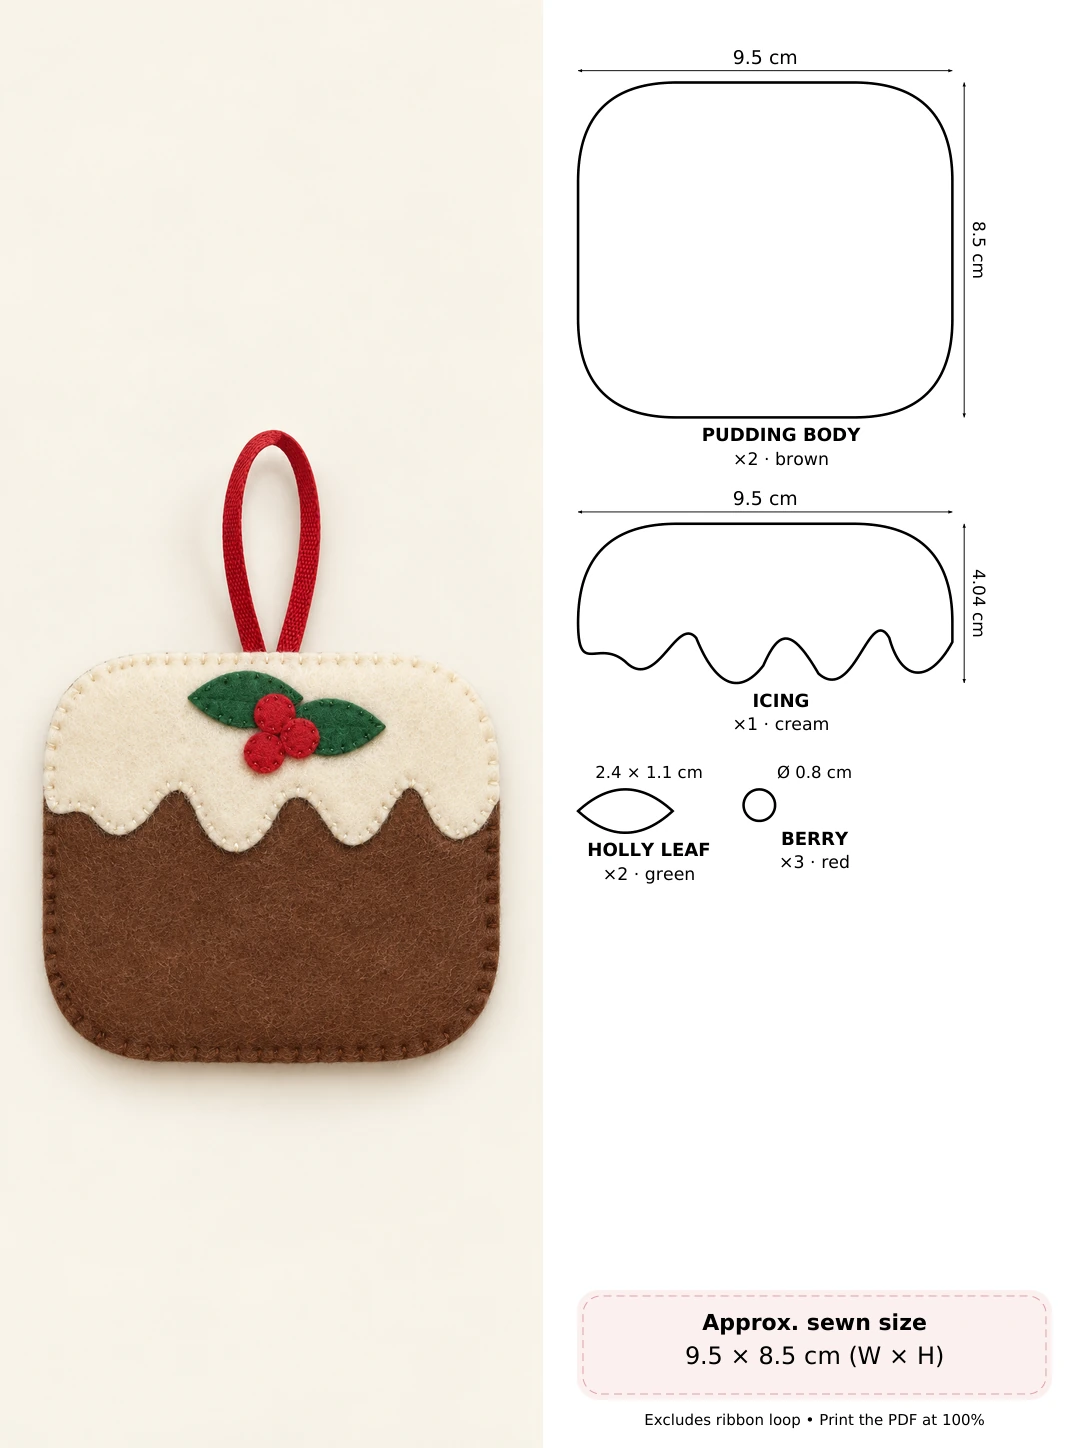
How it comes together: Sew the wavy icing edge onto the front, add the holly, and blanket-stitch the pudding layers around a little filling.
Little sewing tip: Match the top curves carefully before sewing the icing in place.
A Few Tips for Neat Felt Ornaments
- Cut slowly around small curves. Turn the felt instead of twisting your scissors, and keep matching pieces together.
- Finish the front before closing the body. Eyes, embroidery, and flat appliques are much easier to sew while the back is still open.
- Keep the stitches relaxed. Pulling too tightly can pucker the felt. Small, even blanket stitches help the shape stay smooth.
- Use less stuffing than you think. Start with a few wisps and add more only if needed. Narrow points, feet, bows, and flames should stay mostly flat.
- Secure the loop carefully. Catch both ribbon ends with several stitches inside the ornament. Follow the longer anchoring method in the candle PDF.
- Keep them decorative. These ornaments have hanging loops and small parts. They are decorations, not toys, and should be kept away from young children.
Frequently Asked Questions
Do I need a sewing machine?
No. These projects use hand sewing: blanket stitch to join the main edges, small applique stitches for the felt details, and simple embroidery for faces or snowflakes. Practicing on a small scrap first can make the first ornament feel much easier.
Which ornament is easiest to start with?
The heart has only one pattern shape, cut twice, and the star adds just two small cheeks. The gift is another friendly choice if you prefer mostly straight edges. The wreath needs an inner seam as well as an outer seam, so save that one until you are comfortable with curves.
Can I leave out the stuffing?
Yes. The heart, star, candy cane, gift, and wreath can all be sewn flat if you prefer. A small amount of filling gives the other designs a softer finish, but firm stuffing can stretch the edges and change the shape.
Can I make the patterns bigger or smaller?
You can resize a complete pattern, but scale every piece by the same percentage so they still fit together. The printed measurements and 5 cm square are correct only at 100%. Very small versions make the details harder to cut and sew.
How should I store the finished ornaments?
Let the ornaments stay dry and store them flat in a box, with a little tissue between any raised details. For cleaning, follow your felt supplier’s instructions and test a gentle spot-cleaning method on a scrap before touching the finished ornament.
Choose a Little Project and Start Stitching
You do not need to make all 20 at once. Start with one color palette and two or three favorite shapes, then use the leftover felt for the smaller details. A few handmade ornaments can make a tree or gift feel wonderfully personal.
For another woodland project, take a look at the felt fawn ornament tutorial. If you enjoy sewing small felt animals, you may also like the felt sheep pattern.

Leave a Comment